Klaviyo Reviewer Testing Instructions
Intended Audience: Klaviyo App Marketplace Review Team
Purpose: Step-by-step instructions to test the Barika Co-Marketing integration
This video and article is NOT meant for customer consumption.
1. Quick Start for Reviewers
Install URL: https://app.barika.ai/api/klaviyo/install
Klaviyo Account Credentials: app.marketplace@klaviyo.com (we've assumed this is the Klaviyo account you will be testing Barika from and therefore have assumed you already have access to this Klaviyo account)
Barika Test Account Credentials:
- Email: A Barika account has been created for app.marketplace@klaviyo.com. You will need to login to this account to connect your Klaviyo account to Barika.
- Password: password reset request sent to app.marketplace@klaviyo.com
- Installation Path: For review purposes, you will install from the installation URL. The Klaviyo App Marketplace installation flow will be available once the app is listed.
Prerequisites:
- Be logged into Klaviyo with the test account (app.marketplace@klaviyo.com) flows configured.
- The test Barika account above has sample offers available for matching
Time Required: 15-25 minutes per flow
2. Test Use Cases
Use Case 1: OAuth Installation from Barika
Starting Point: Ensure you are logged into Klaviyo with the test account (app.marketplace@klaviyo.com). If not logged in, Klaviyo will prompt you to log in first when you try to access the installation URL
1 - Access the Install URL:
https://app.barika.ai/api/klaviyo/install
2 - You will be redirected to Klaviyo OAuth authorization page
3 - Review the requested permissions and click Allow
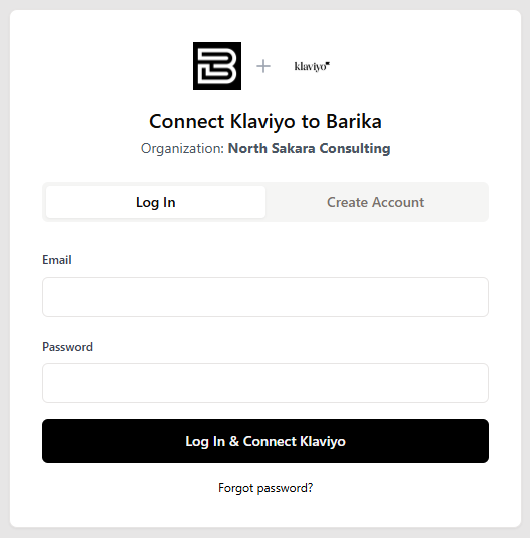
4 - You will be redirected to the Barika + Klaviyo connect page showing:
- Dual-logo header (Barika favicon + Klaviyo logo)
- Your Klaviyo organization name
- Tabbed interface with Log In and Create Account options
5 - Click the Log In tab (should be selected by default)
6 -Enter the test credentials:
- Email: app.marketplace@klaviyo.com
- Password: we've sent a password reset to app.marketplace@klaviyo.com
7 - Click Log In & Connect Klaviyo
8 - You will be redirected to the Barika + Klaviyo setup wizard
Expected Result: Authorization is successful. After logging in on the connect page, you are redirected to the setup wizard. The connection is not yet "Connected" until the setup wizard is complete.
Use Case 2: Complete the Barika + Klaviyo Setup Wizard
Continuing from Scenario 1, you are now in the 6-step onboarding wizard:
1 - Welcome page: Review the introduction, then click Continue
2 - Your Installation Goals page (Channel & Role Selection):
- Select at least one channel (SMS, Email, or both)
- Select at least one role (Host Partner, Offer Partner, or both)
- Click Continue
3 - Compliance page: Review and acknowledge the co-marketing terms, then click Continue
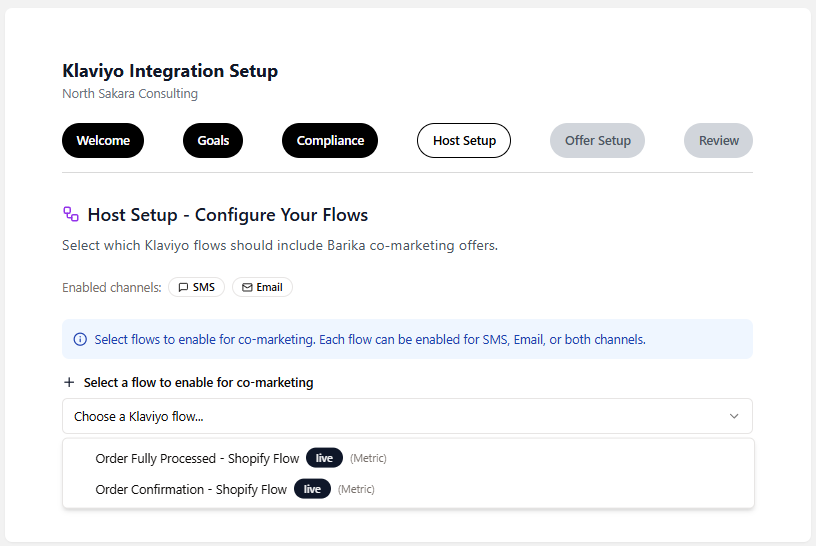
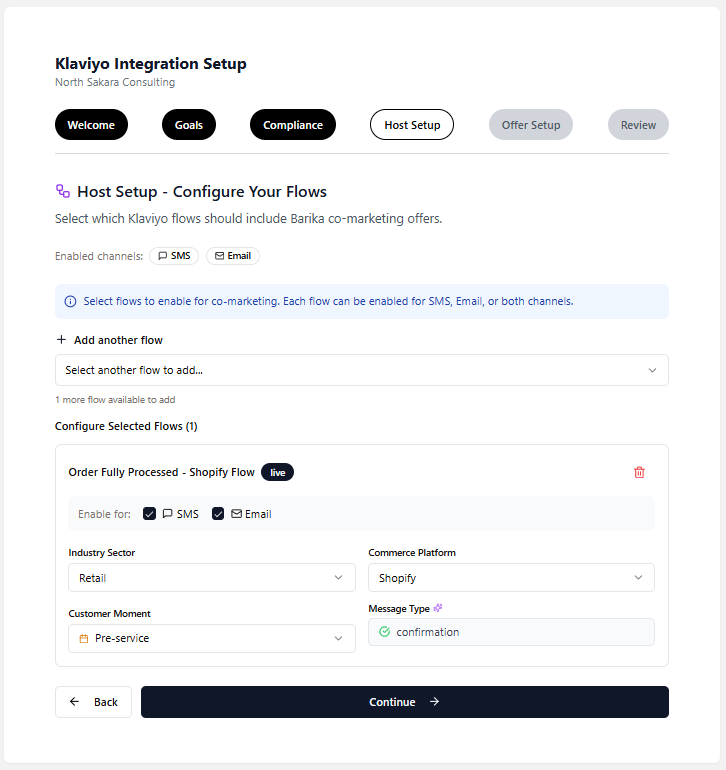
4 - Host Setup page (if Host Partner selected):
- You will see a unified list of all your Klaviyo flows
- Select which flows should include Barika co-marketing offers
- If you enabled both SMS and Email channels, each flow shows checkboxes to select which channels to enable
- If you enabled only one channel, flows automatically use that channel (shown with a badge)
- For each selected flow, configure:
- Industry Sector (e.g., Retail, Insurance, Travel, Rail)
- Commerce Platform (only appears if Retail is selected - choose Shopify, WooCommerce, etc.)
- Message Type (auto-derived from flow trigger)
- Customer Moment (Pre-service, In-service, or Post-service)
- Click Continue
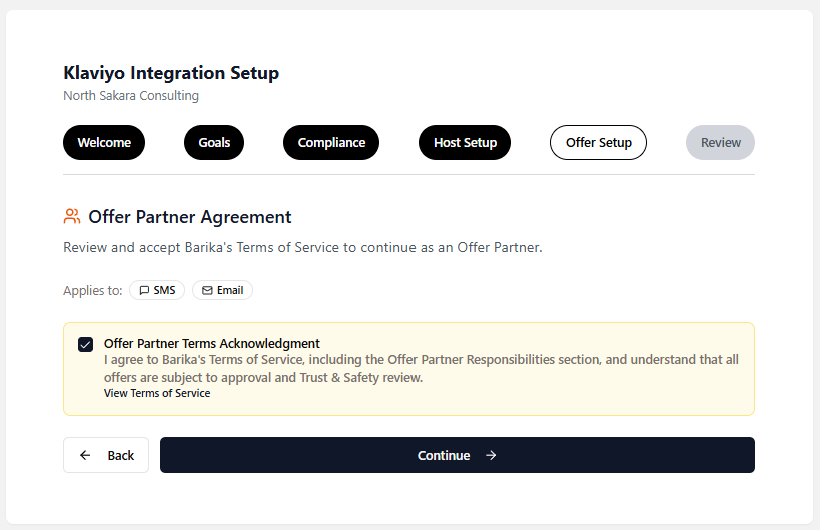
5 - Offer Setup page (if Offer Partner selected):
- Review the Offer Partner Agreement.
- Check the Offer Partner Terms Acknowledgment checkbox to agree to Barika Terms of Service Policy
- Click Continue
6 - Review page: Review the confirmation and next steps
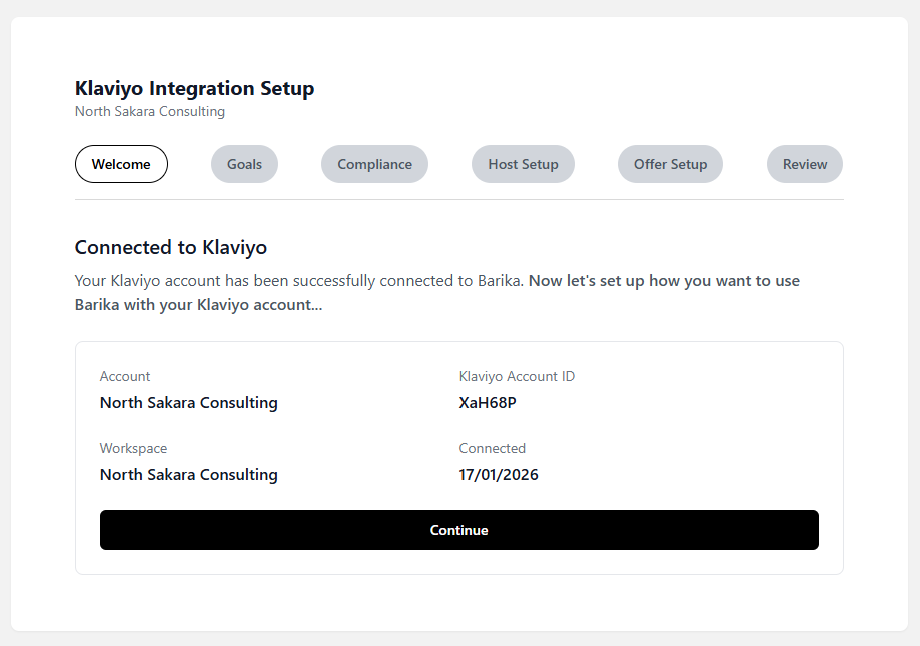


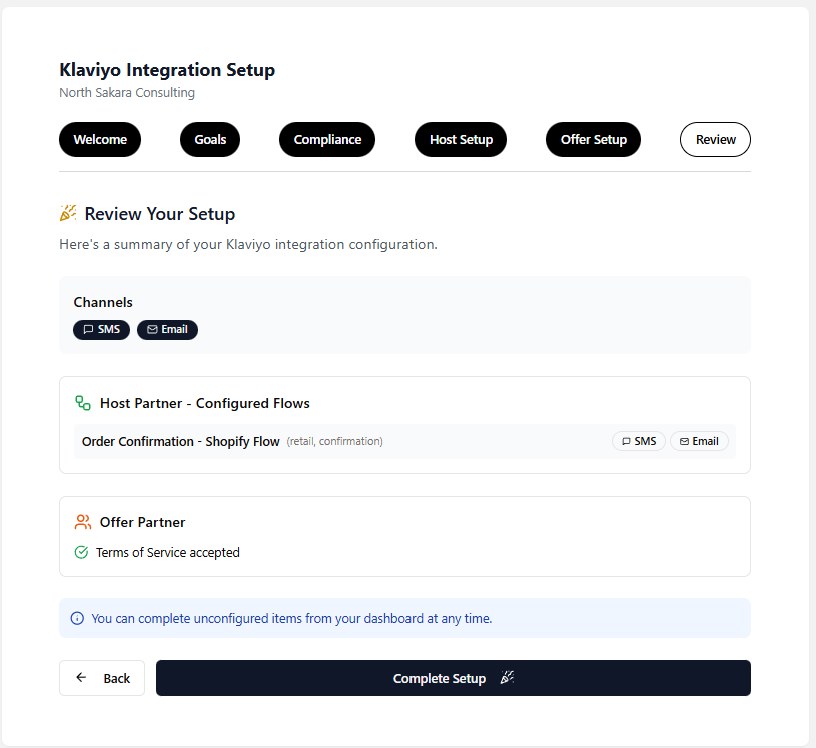
Expected Result: Onboarding completes successfully. The Klaviyo connection now appears in Integration Centre with "Connected" status. A green checkmark or "Connected" badge is visible on the Klaviyo card.
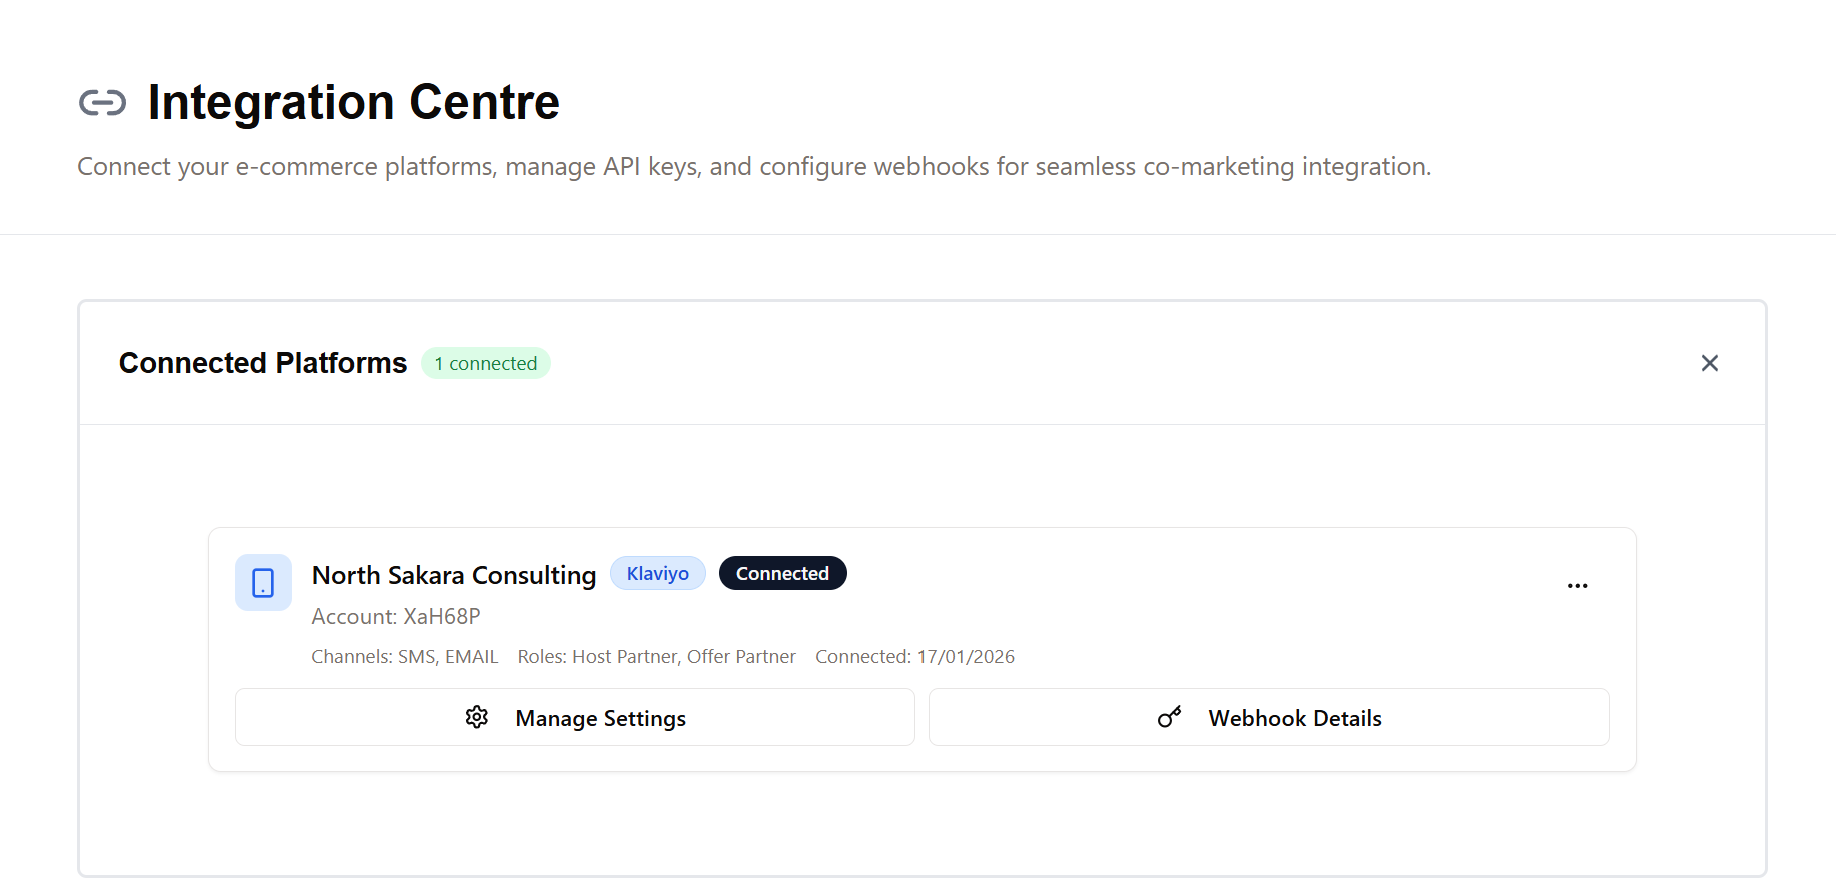
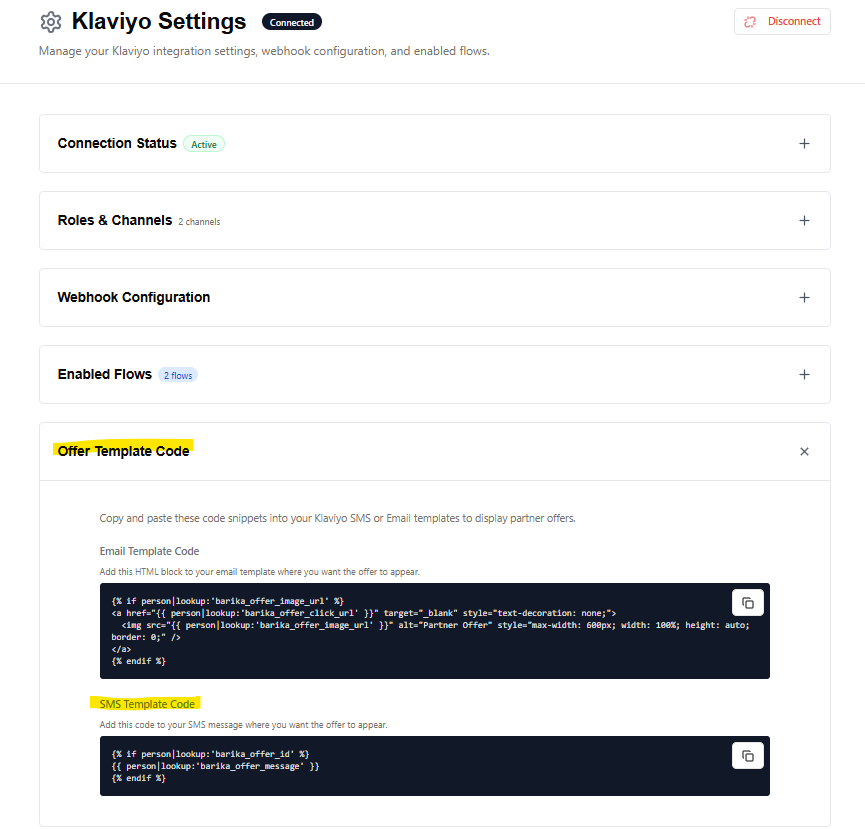
Use Case 3: View Klaviyo Connection Detailed Settings
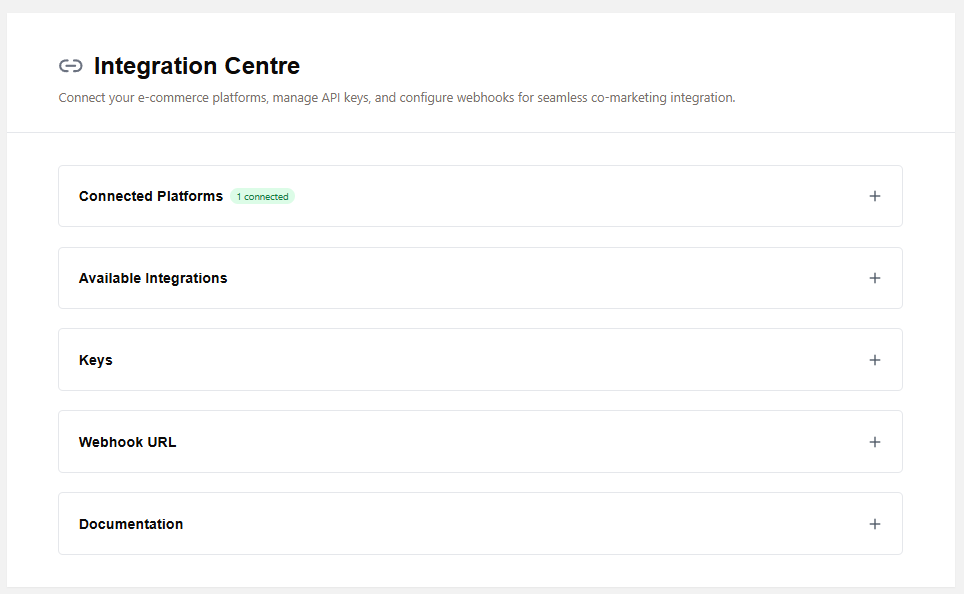
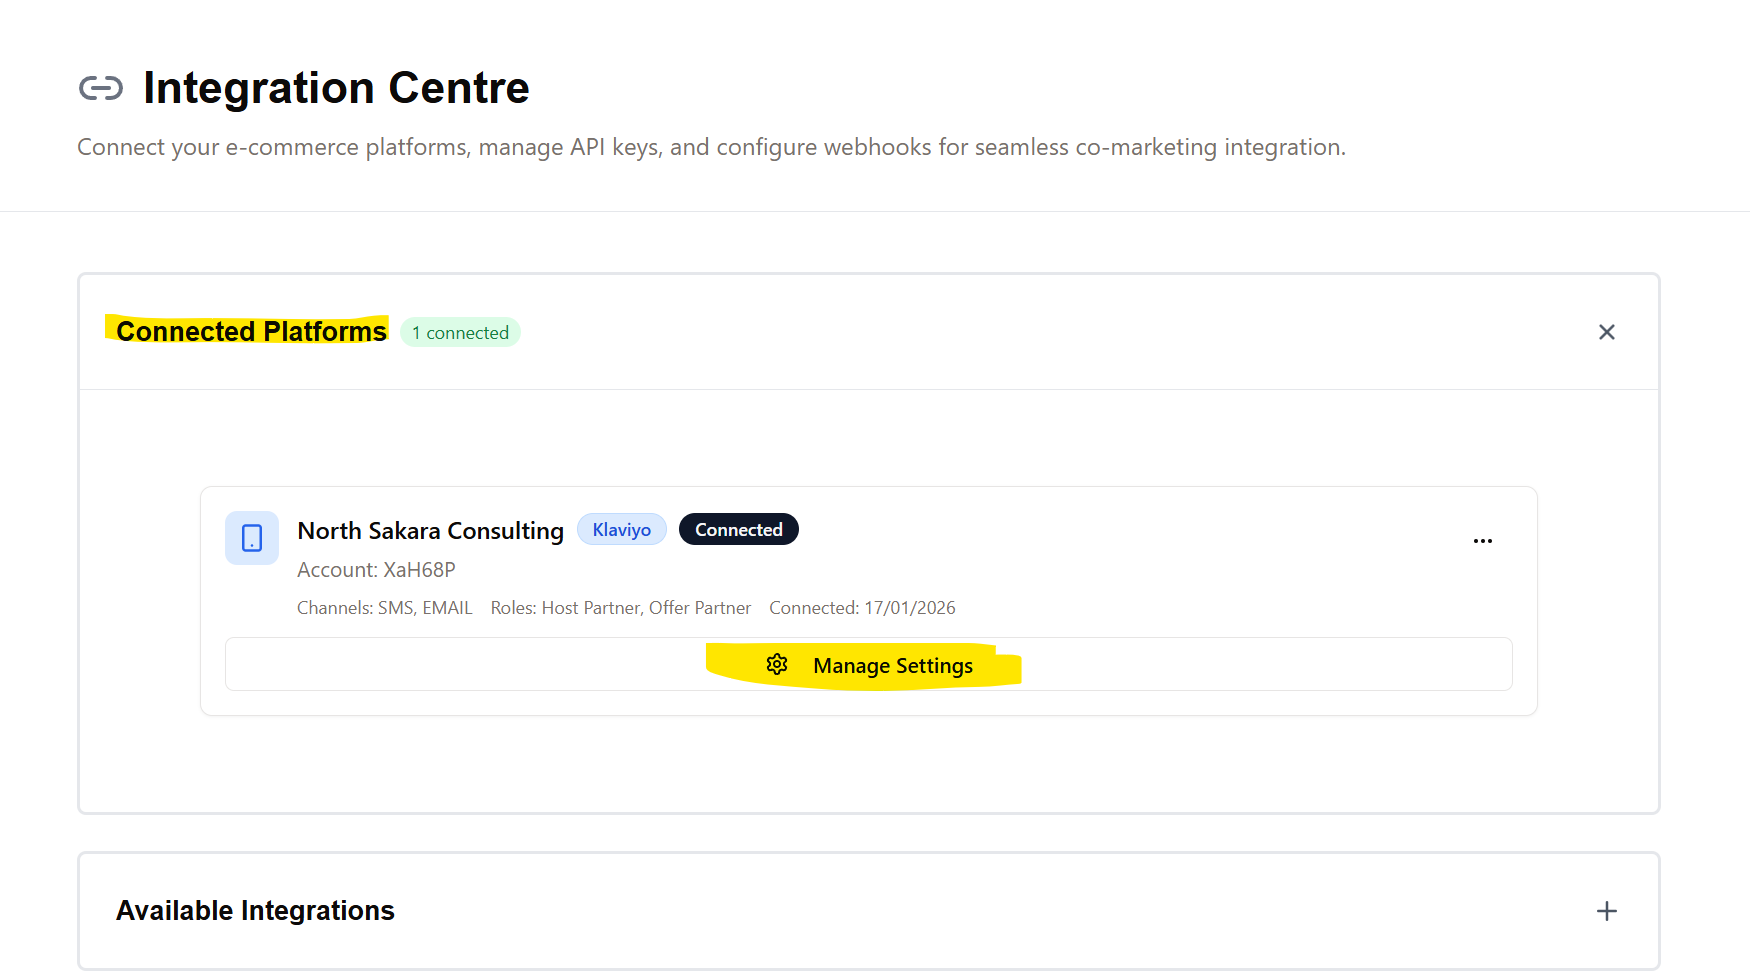
1 - Navigate to Integration Centre
2 - Click Connected Platforms
3 - Look for the connected Klaviyo card and click on the button 'Manage Settings'. This takes you to the Klaviyo Settings page.
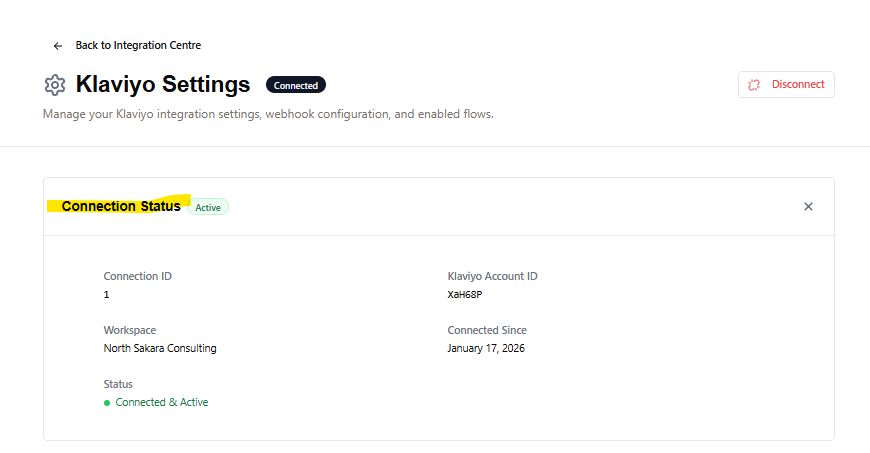
4 - Expand the Connection Status section and verify:
- Connection ID
- Klaviyo Account ID
- Workspace name
- Connected Since date
- Status (Connected & Active)
5 - Expand the 'Webhook Configuration' section and verify:
- Webhook Endpoint URL - the URL to add as a webhook action in Klaviyo flows
- Webhook Key - X-Barika-Key
- Webhook Secret (Secret) - with show/hide toggle and regenerate option
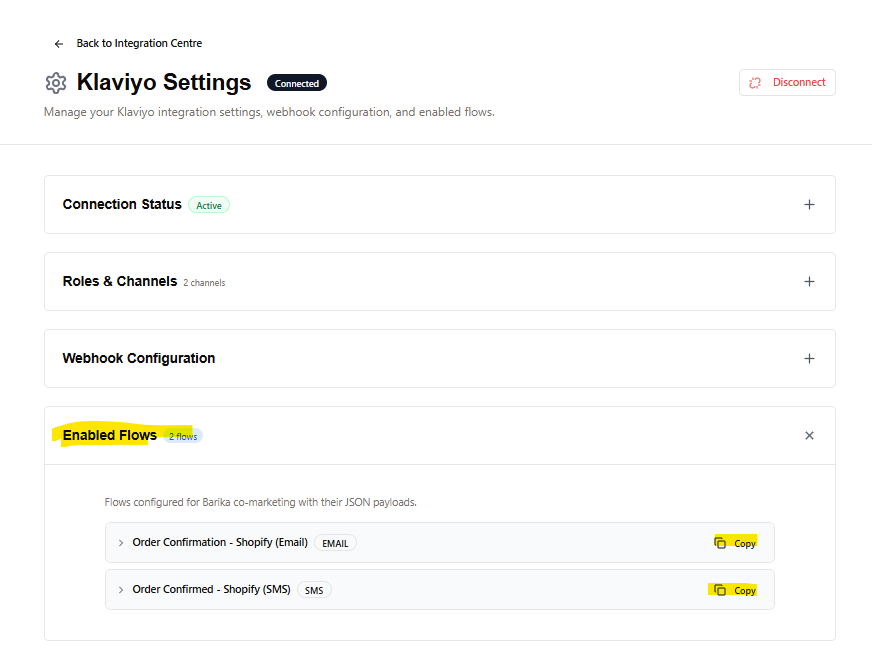
6 - Expand the Enabled Flows section and verify:
- List of configured flows with JSON payloads
- Copy button for each flow's JSON payload
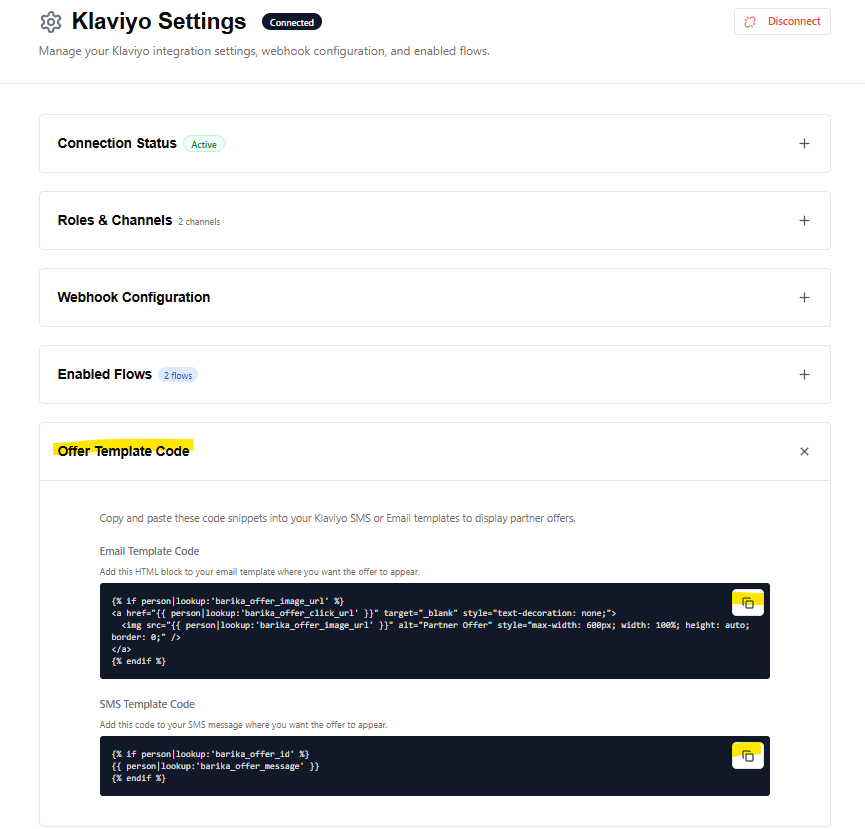
7 - Expand the Offer Template Code section and verify:
- Email Template Code (HTML block for email templates)
- SMS Template Code (template code for SMS messages)
- Copy button for each template
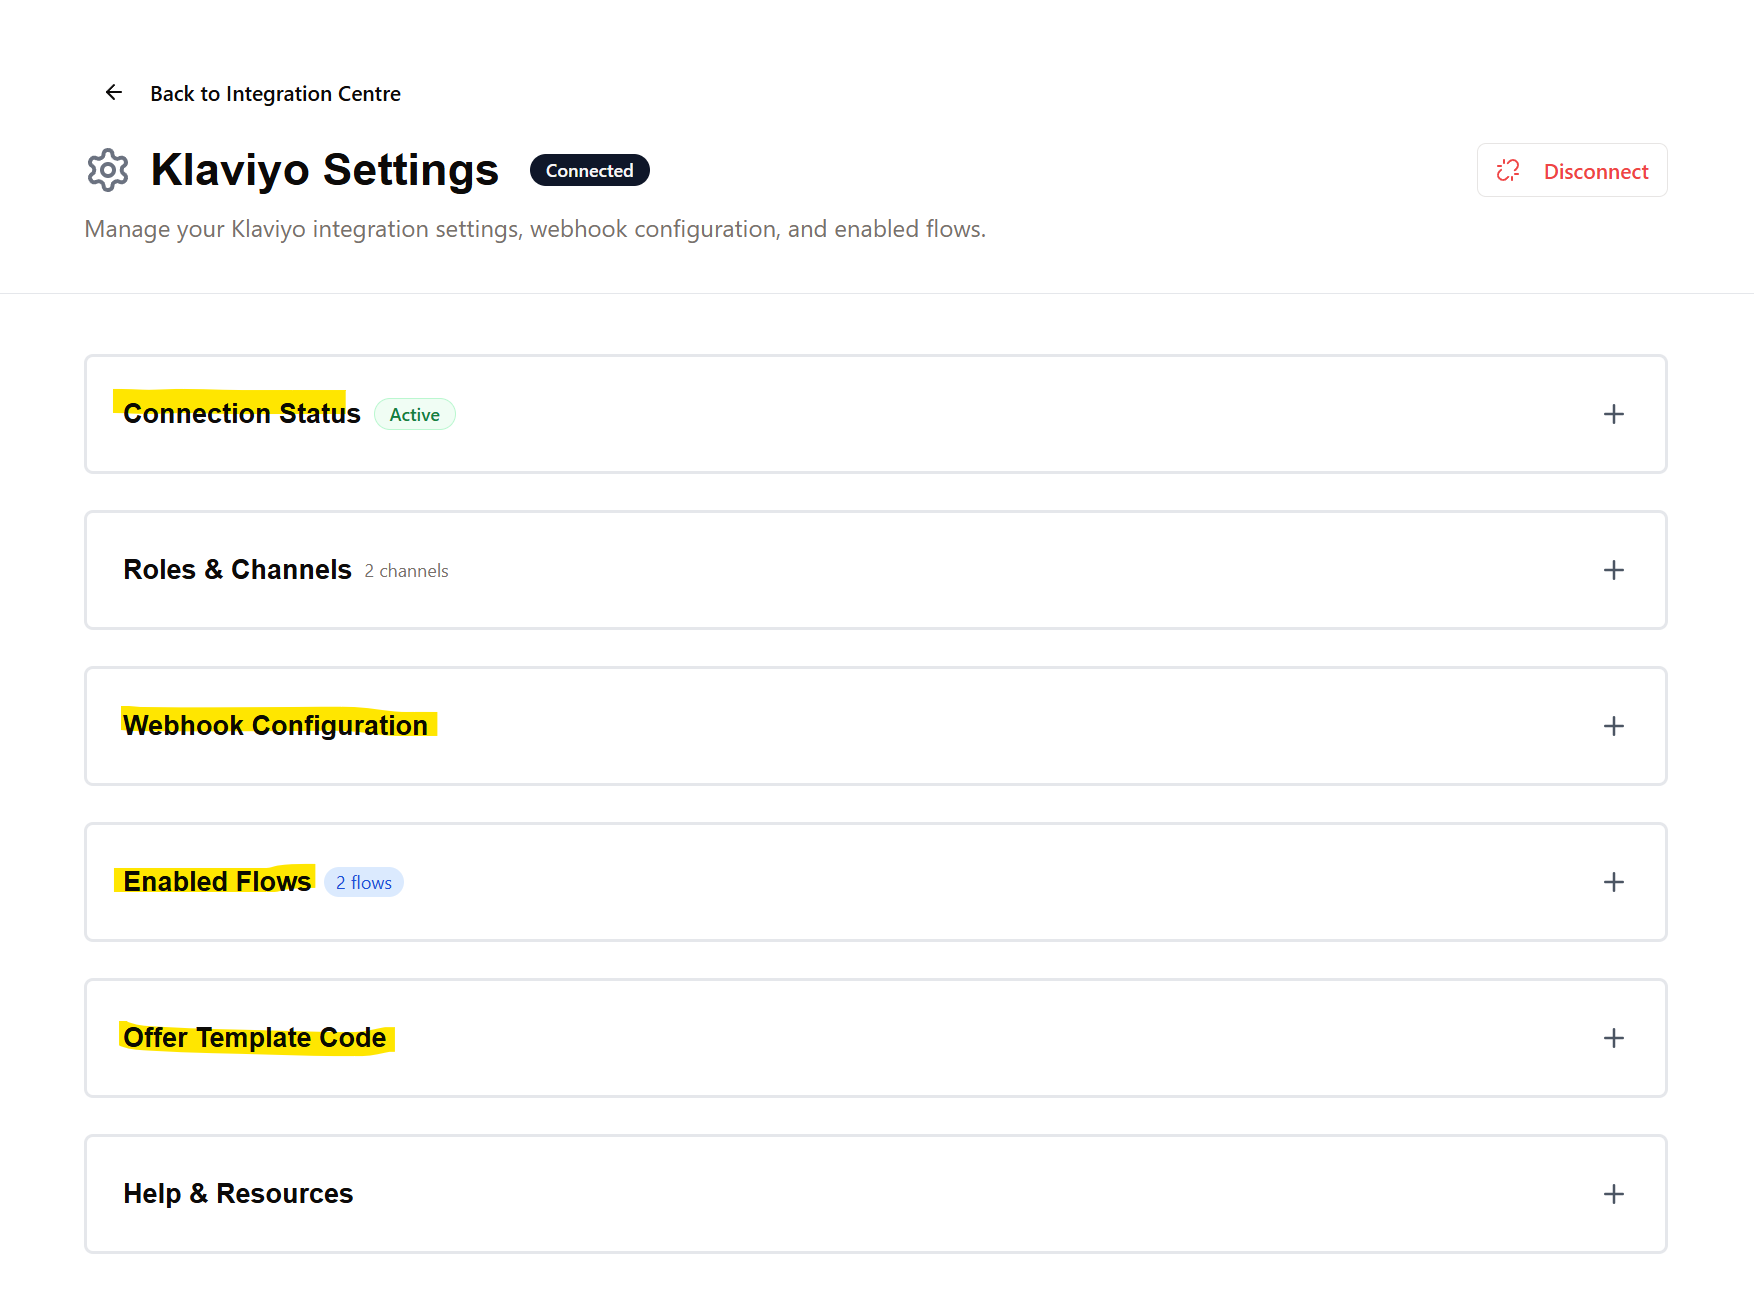

Expected Result: All connection details, webhook configuration, and offer template code are visible and can be copied directly from the settings page.
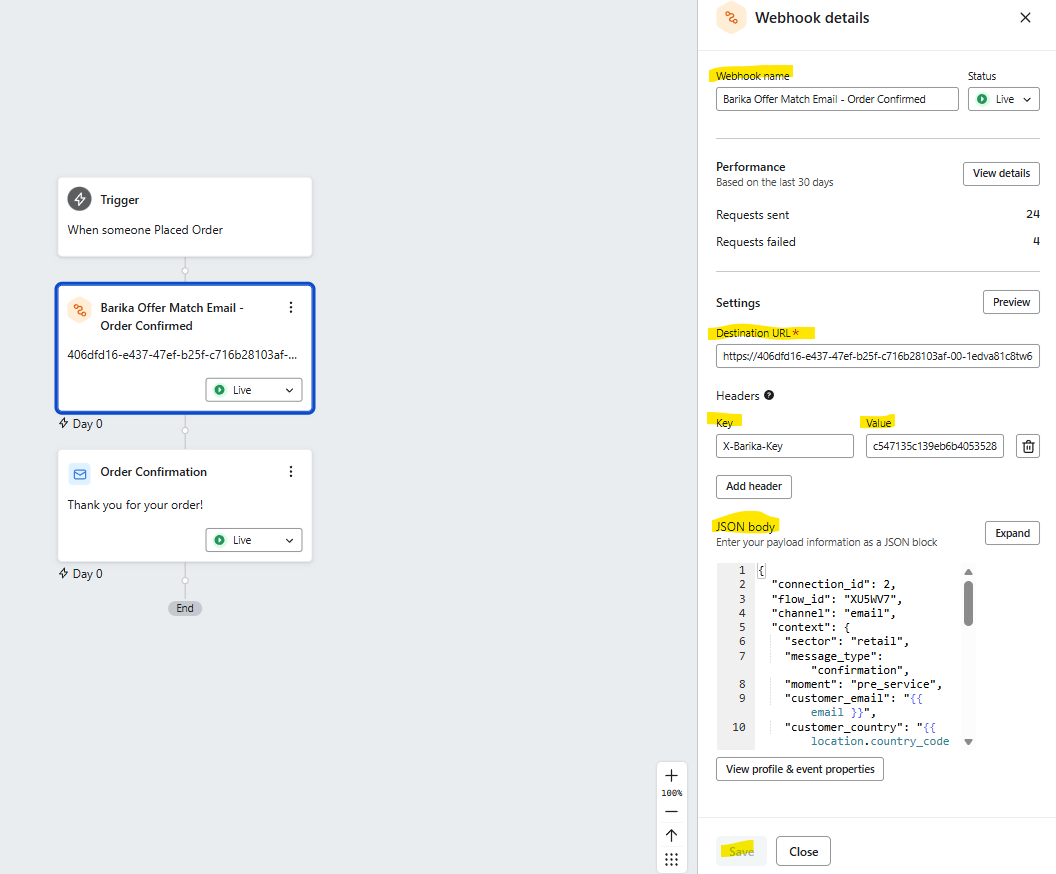
Use Case 4: Configure Webhook in Klaviyo Flow
1 - Open Barika and Klaviyo side by side
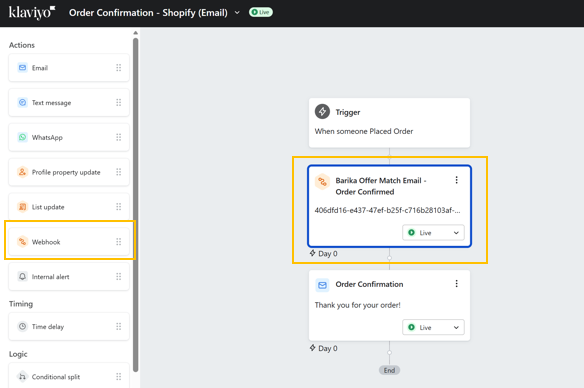
2 - In Klaviyo, open a flow (e.g., Order Confirmation)
3 - Add a Webhook action BEFORE the SMS or Email step. Provide a Webhook name.
4 - In Barika, navigate to Integration Centre → click Manage Settings on the Klaviyo card
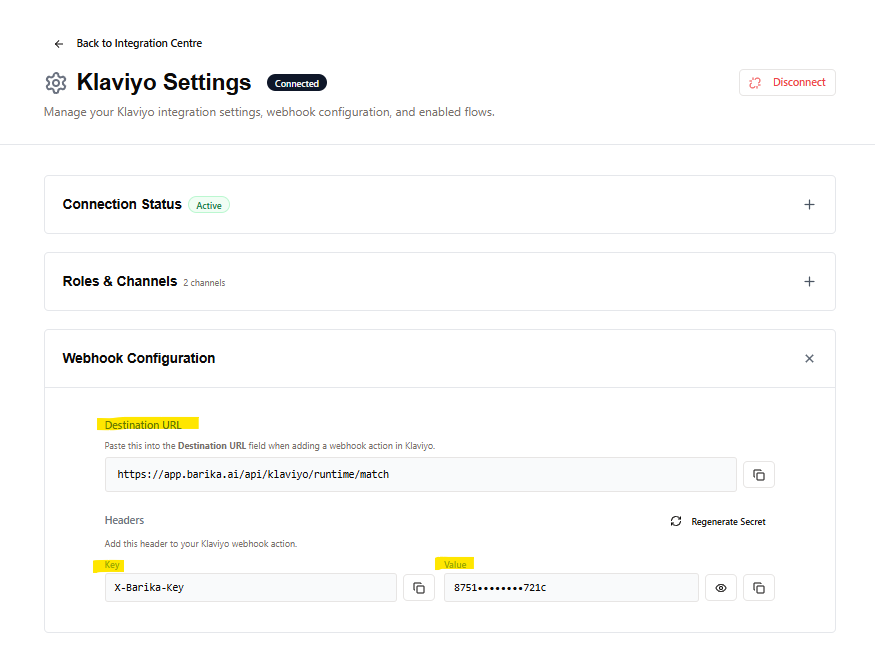
5 - Configure the webhook destination:
- In Barika: Expand Webhook Configuration and copy the Destination URL
- In Klaviyo: Paste into the Destination URL field
6 - Configure the webhook header:
- In Barika: From the Headers section, copy the Key (X-Barika-Key)
- In Klaviyo: Click Add header, paste the key
- In Barika: Copy the Value (the secret)
- In Klaviyo: Paste the value
7 - Configure the webhook body:
- In Barika: Expand Enabled Flows and copy the JSON payload for your flow
- In Klaviyo: Paste into the Body field
8 - Set the webhook action to Live
Expected Result: Webhook is configured in Klaviyo. The webhook action shows as Live and ready to trigger.
Expected Result:
Webhook is configured in Klaviyo. When the flow triggers, Barika will receive the webhook and match an offer.
Use Case 5a: Add Offer Template Code to Email Messages
1 - In Barika, navigate to Integration Centre → Expand the Connected Platforms section →Look for your Klaviyo card →click Manage Settings on the Klaviyo card
2 - Expand the Offer Template Code section
3 - Copy the Email Template Code (HTML block)
4 - In Klaviyo, open the same flow from Scenario 4
5 - Edit the Email message that follows the webhook action
6 - Add an HTML block to the email template
7 - Paste the Email Template Code into the HTML block
8 - Save the message

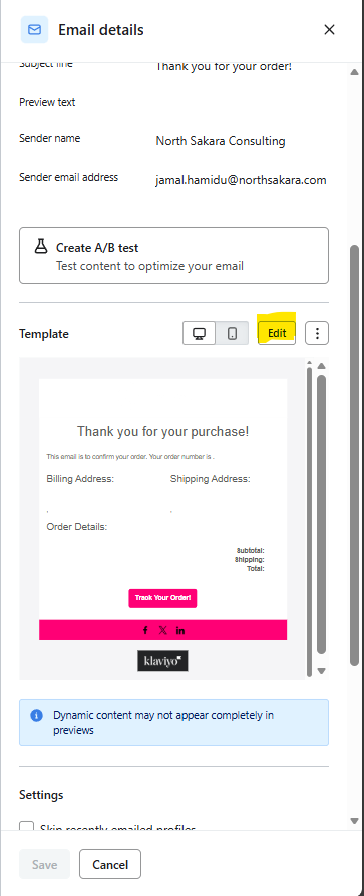
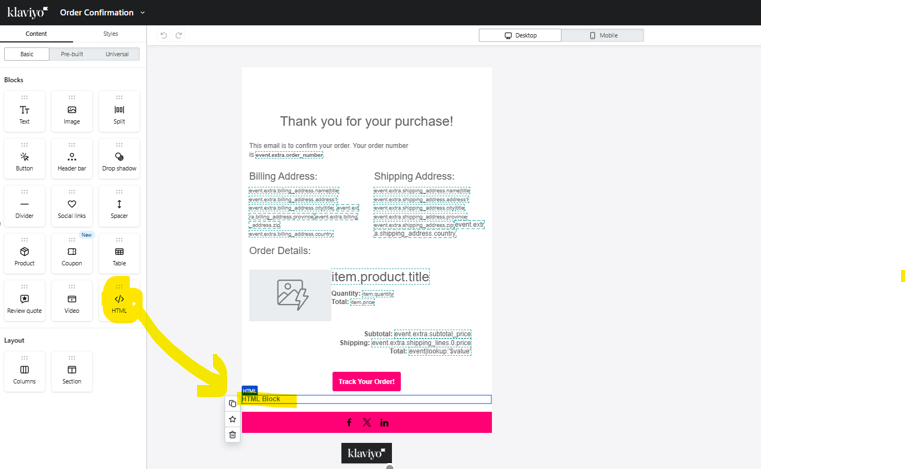
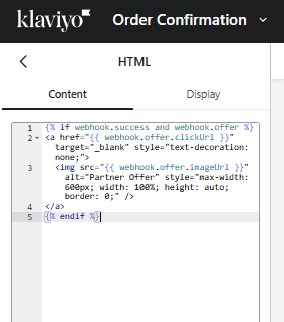
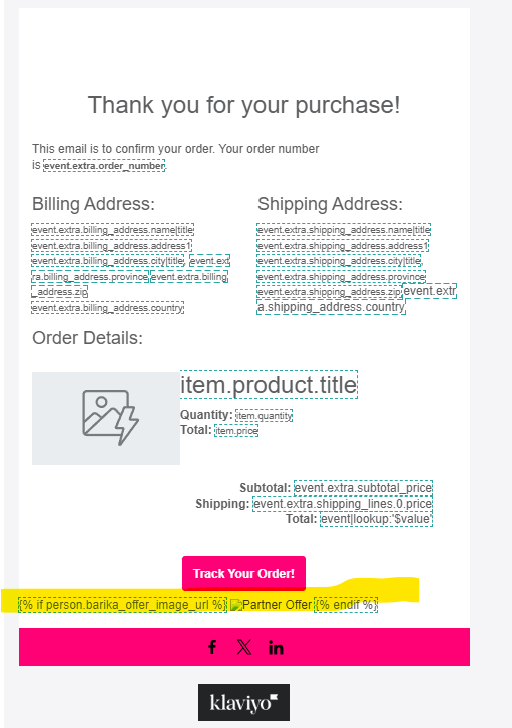
Expected Result:
The HTML block is added to the email. When the flow triggers, Barika renders a branded offer card image that displays in the email.
Use Case 5b: Add Offer Template Code to SMS Messages
1 - In Barika, navigate to Integration Centre → Expand the Connected Platforms section →Look for your Klaviyo card →click Manage Settings on the Klaviyo card
2 - Expand the Offer Template Code section
3 - Copy the SMS Template Code (HTML block)
4 - In Klaviyo, open the same flow from Scenario 4
5 - Edit the SMS message that follows the webhook action
6 - Insert the SMS Template Code where you want the offer to appear (typically at the end of the message)
7 - Save the message
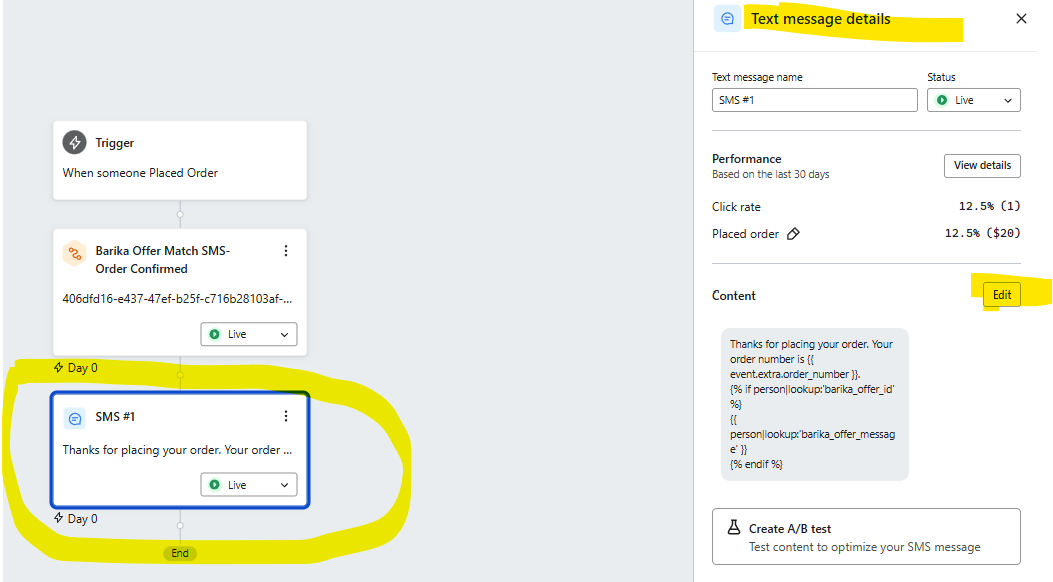
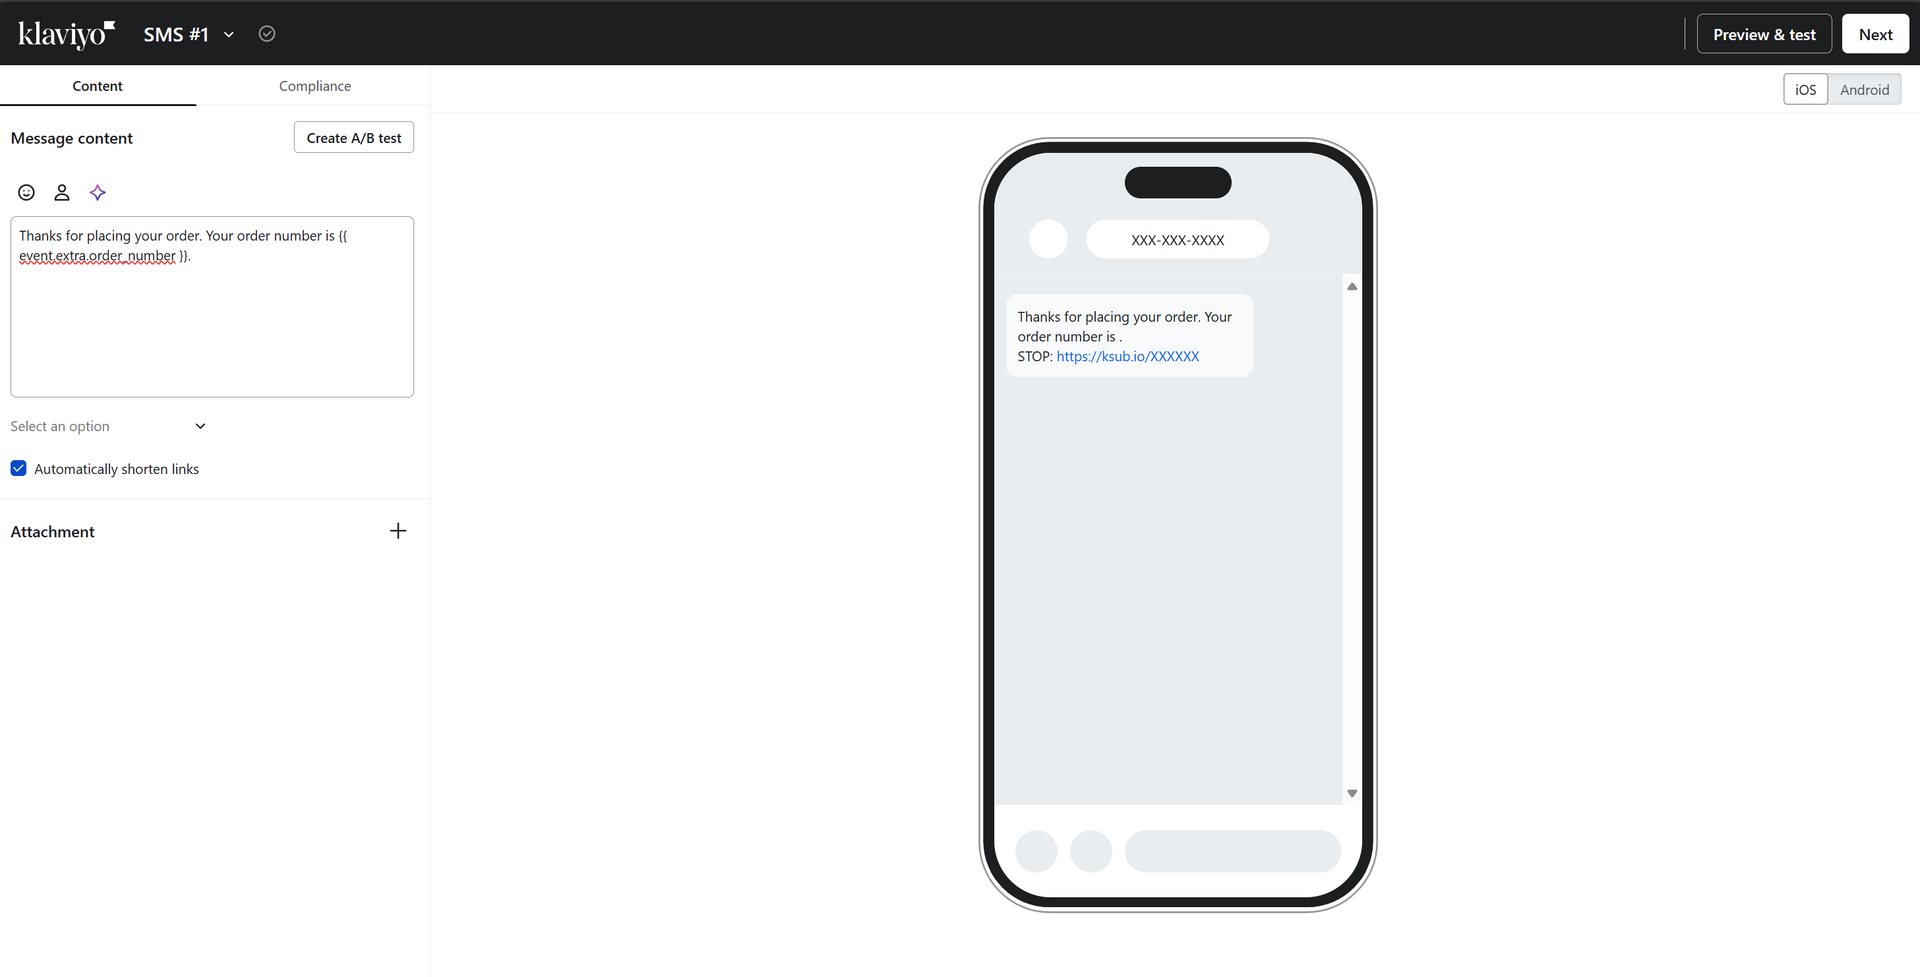
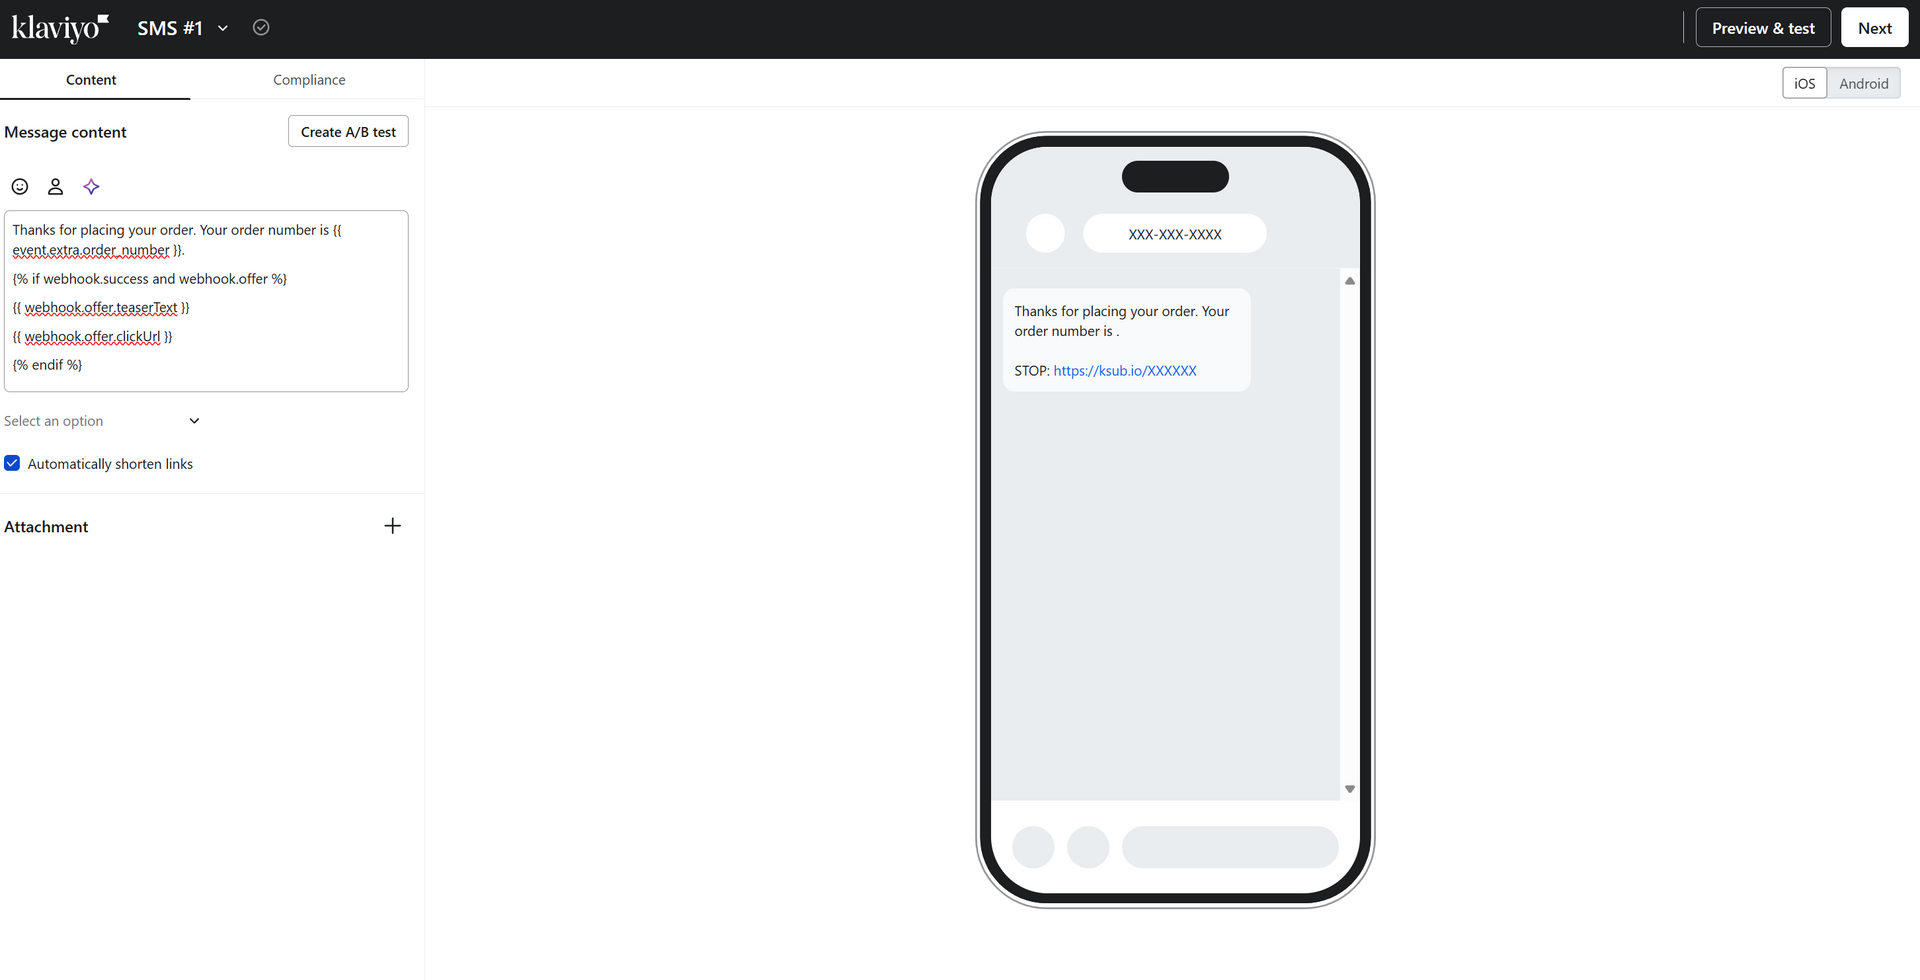
Expected Result:
The template code is added to the SMS. When the flow triggers, the message includes offer text and a trackable short link for the customer to tap.
Scenario 6: Verify Offer Matching (Trigger a Flow)
1 - Ensure Scenarios 1-5 are complete
2 - In Klaviyo, trigger a test event that activates the flow (e.g., place a test order)
3 - Wait for the flow to process (webhook fires to Barika)
4 - In Klaviyo, check the customer profile
Expected Result: The Klaviyo profile is updated with Barika offer properties:
For Email matches (if email flow triggered):
- barika_email_offer_image_url - Rendered offer card image URL
- barika_email_offer_click_url - CPE-enabled tracking link
- barika_email_offer_tracking_url - Impression tracking pixel URL
- barika_email_offer_teaser_text - Offer teaser text
- barika_email_offer_brand_name - Offer partner brand name
- barika_email_offer_message - Composed message text
- barika_email_offer_id - Offer identifier
- barika_email_offer_expires_at - Offer expiration timestamp (ISO 8601)
For
SMS
matches (if email flow triggered):
- barika_sms_offer_image_url - Rendered offer card image URL
- barika_sms_offer_click_url - CPE-enabled tracking link
- barika_sms_offer_tracking_url - Impression tracking pixel URL
- barika_sms_offer_teaser_text - Offer teaser text
- barika_sms_offer_brand_name - Offer partner brand name
- barika_sms_offer_message - Full composed SMS message
- barika_sms_offer_id - Offer identifier
- barika_sms_offer_expires_at - Offer expiration timestamp (ISO 8601)
- barika_sms_offer_updated_at - Last update timestamp (ISO 8601)
Scenario 7: View Analytics Across Centres
If you are already logged in from a previous use case, skip to step 2
1 - If not logged in: Navigate to https://app.barika.ai and log in with the test credentials (Email: app.marketplace@klaviyo.com, Password: enter your reset password
2 - Start on the Dashboard to view high-level analytics:
Dashboard - My partnerships:
- Shows active brand partnerships and partnership performance at a glance
- Displays partnership reach, engagement, and campaign ROI
- Expected: Partnership overview with metrics visible
Dashboard - Messages & Revenue Performance:
- Shows messages monetized and revenue breakdown
- Displays total messages enhanced, average revenue per message, CPE and CPR earnings
- Expected: Metrics from co-marketing activity (may show data from Use Case 6)
3 - Navigate to each of the following centres (each provides analytics specific to its purpose):
Brand Offer Centre:
- Shows offers created by this account (as Offer Partner)
- Since this test account has not created offers, this section displays an empty state
- Expected: Empty state or "No offers created" message
Partnership Centre:
- Shows partner network and brand relationships
- Displays partnership activity and connection status
- Expected: Partnership overview (may show connected partners)
Revenue Centre:
- Shows Host Partner earnings from placing partner offers in messages
- After completing Use Case 6, you should see data from the test order match
- Expected: At least 1 impression from the email match triggered in Use Case 6, with channel breakdown.
Spend Centre:
- Shows Offer Partner spend on campaigns and wallet balance
- Since this test account's offers have not been matched to partner messages, spend data is minimal
- Expected: Minimal or zero spend data (realistic for an account that hasn't created active offers)
Expected Result: The Dashboard shows high-level co-marketing activity, and each centre provides visibility into its specific area (offers, partnerships, revenue, spend). Revenue Centre shows real data from the Use Case 6 test order. Other centres may show empty states, which is realistic for a test account - this demonstrates the platform handles both active and inactive states appropriately.
Scenario 8: Create an Email Offer in Barika
1 - Log in to Barika using the test credentials
2 - Navigate to the Brand Offer Centre→ Click on Create Offer →Select Email
3 - Complete the email creation form
4 - Click create Email Offer button to save offer
Expected Result:
- Email offer successfully created and in listed in the Offer list in the Brand Offer Centre.
Scenario 9: Disconnect from Barika
1 - Log in to Barika using the test credentials
2 - In Barika, navigate to Integration Centre → Expand the Connected Platforms section →Look for your Klaviyo card →click Manage Settings on the Klaviyo card
3 - Click Disconnect or Remove Connection
4 - Confirm the disconnection when prompted
Expected Result:
- Klaviyo connection is removed from Barika Integration Centre
- The Klaviyo card returns to "Not Connected" state
- The app is removed from Klaviyo's authorized apps list

Scenario 10: Disconnect from Klaviyo
1 - Log in to Klaviyo
2 - Navigate to Integrations
3 - Find Barika app in the list
4 - Click on the 3 dots at the far end and click Remove Integration
5 - Confirm removal
Expected Result:
- The app is removed from Klaviyo
- Barika receives the uninstall webhook and updates the connection status to disconnected.

Scenario 11: Deny Permission During OAuth
1 - Start the OAuth installation flow (Use Case 1, steps 1-5)
2 - On the Klaviyo permission screen, click Deny instead of Allow
Expected Result (Inbound flow - starting from Klaviyo):
- You are redirected to the Barika sign-in page (/auth?error=klaviyo_permission_denied)
- An error parameter indicates that permission was denied
- User can sign in or create an account and retry the connection.
Expected Result (Outbound flow - starting from Barika Integration Centre):
- You are redirected to the Barika sign-in page (/auth?error=klaviyo_permission_denied)
- An error parameter indicates that permission was denied
- User can sign in or create an account and retry the connection.
| URL TYPE | URL |
|---|---|
| App URL | https://app.barika.ai |
| Install URL | https://app.barika.ai/api/klaviyo/install |
| Settings URL | https://app.barika.ai/portal/integrations/klaviyo |
| Support URL | https://barika.ai/help |
| Privacy Policy | https://barika.ai/legal/privacy |
| Terms of Service | https://barika.ai/legal/terms |
Support Contact
| Support Type | Contact |
|---|---|
| Email Support | support@barika.ai |
| Technical Support | jamal.hamidu@barika.ai |
Appendix A: Integration Architecture
Data Flow Overview
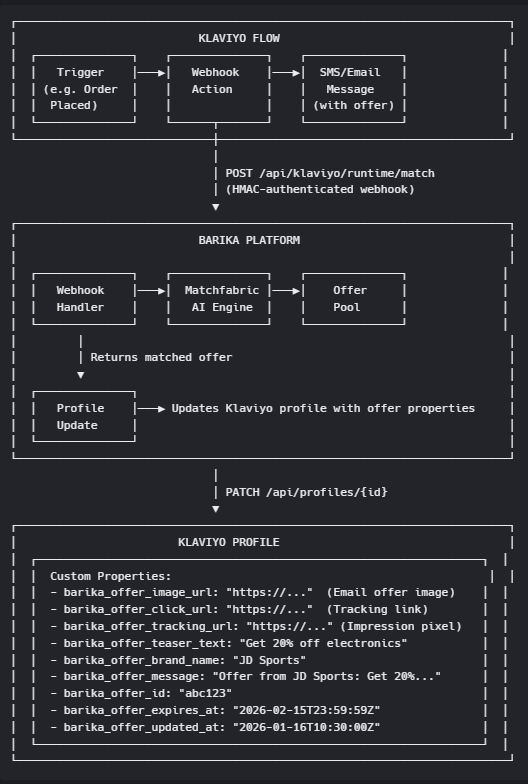
How It Works
- A Klaviyo flow triggers (e.g., order placed, shipment update)
- The webhook action sends event data to Barika's runtime endpoint
- Barika's Matchfabric® AI matches a relevant partner offer
- Barika updates the Klaviyo profile with offer properties
- The Klaviyo flow continues, embedding offer data in the SMS/Email message
Appendix B: API Endpoints Used
| USE CASE | Klaviyo API EndpointURL |
|---|---|
| Read customer profiles for offer personalization | GET https://a.klaviyo.com/api/profiles/{id} |
| Write offer properties to customer profiles | PATCH https://a.klaviyo.com/api/profiles/{id} |
| List available flows for configuration | GET https://a.klaviyo.com/api/flows |
| Read subscriber lists for audience targeting | GET https://a.klaviyo.com/api/lists |
| Read segments for audience matching | GET https://a.klaviyo.com/api/segments |
Appendix C: API Scope Justification
| SCOPE | Why Barika Needs This |
|---|---|
| profiles:read | Read customer profile data to personalize offer matching based on purchase history and preferences |
| profiles:write | Write matched offer properties (title, URL, image) to customer profiles for use in flow messages |
| flows:read | Read flow configurations to display available flows for webhook integration setup |
| flows:write | Enable automated webhook action configuration within customer flows |
| lists:read | Read subscriber lists to enable audience-based targeting for offers |
| segments:read | Read segments to enable segment-based targeting and exclusions |