Barika for Klaviyo Webhook Setup Guide
Add Barika to your Klaviyo flows. Copy your pre-generated webhook payload, paste it into your flow, and start matching offers to your messages.
1. Overview and & time estimates
This guide walks you through adding Barika offer matching to your Klaviyo flows using webhook actions. Once set up, Barika will return personalized partner offers that you can insert into your SMS and Email messages.
Time Required: 10-15 minutes per flow
2. Prerequisites
Before starting, ensure you have:
1 - Barika Account connected to Klaviyo (OAuth completed)
2 - Your Connection ID (found in Barika Integration Centre)
3 - Your Webhook Secret (provided during Klaviyo onboarding)
4 - Host Placement Authorization completed for your channel (SMS and/or Email)
3. Step by step instructions
Step 1: Get your connection details
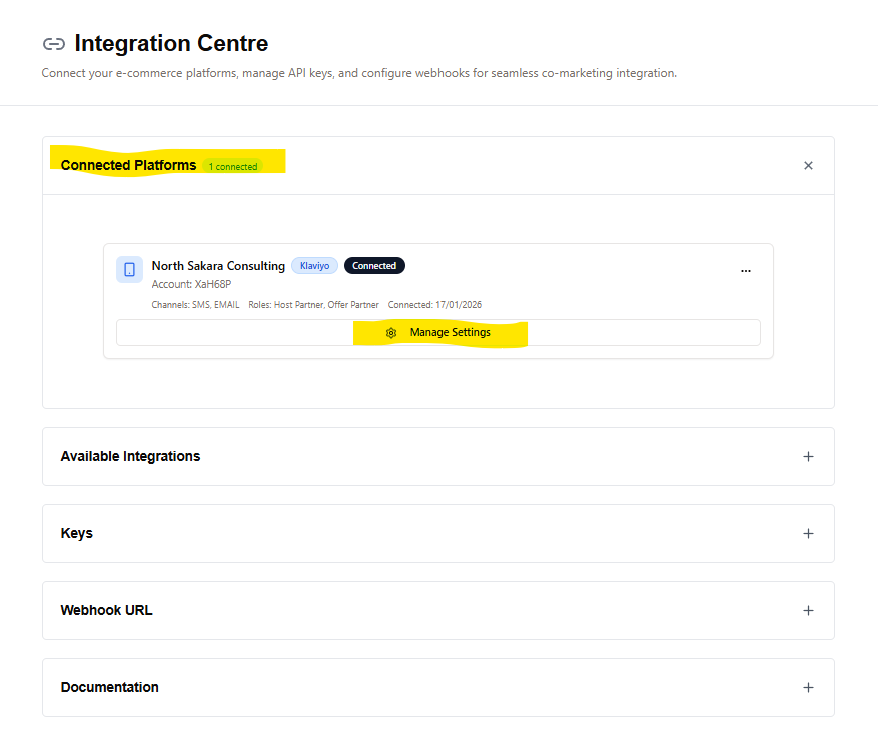
1 - Log into Barika
2 - Navigate to Integration Centre → Connected Platforms
3 - Find your Klaviyo connection. Click Manage Settings.
4 - Copy your:
- Connection ID (numeric, e.g., 42)
- Webhook Secret (for HMAC signature generation)
- Webhook Endpoint URL: https://your-barika-domain.com/api/klaviyo/runtime/match
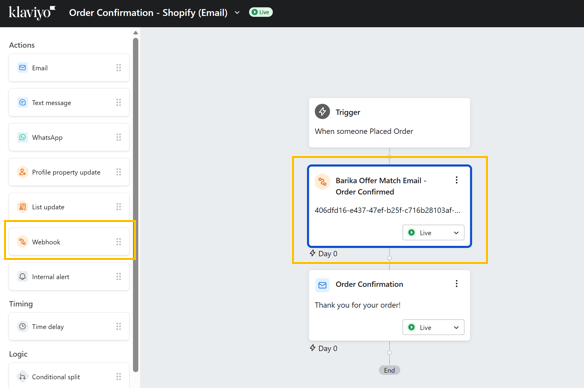
Step 2: Add Webhook Action to Your Flow
1 - Open your Klaviyo flow in the Flow Builder
2 - Drag the Webhook action from the left sidebar
3 - Drop it BEFORE your SMS/Email step (so Barika returns offers before you send your message)
4 - Click on the webhook block to open Webhook details
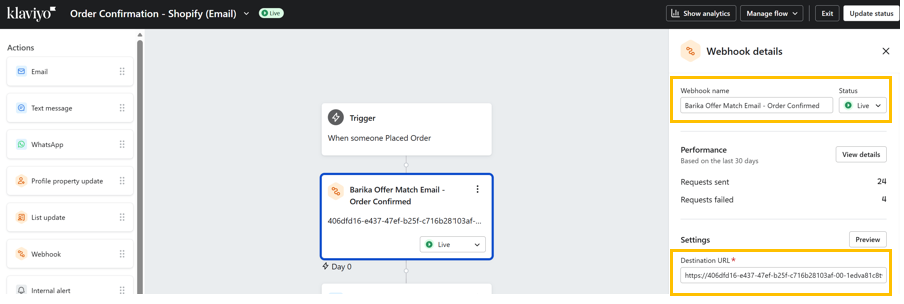
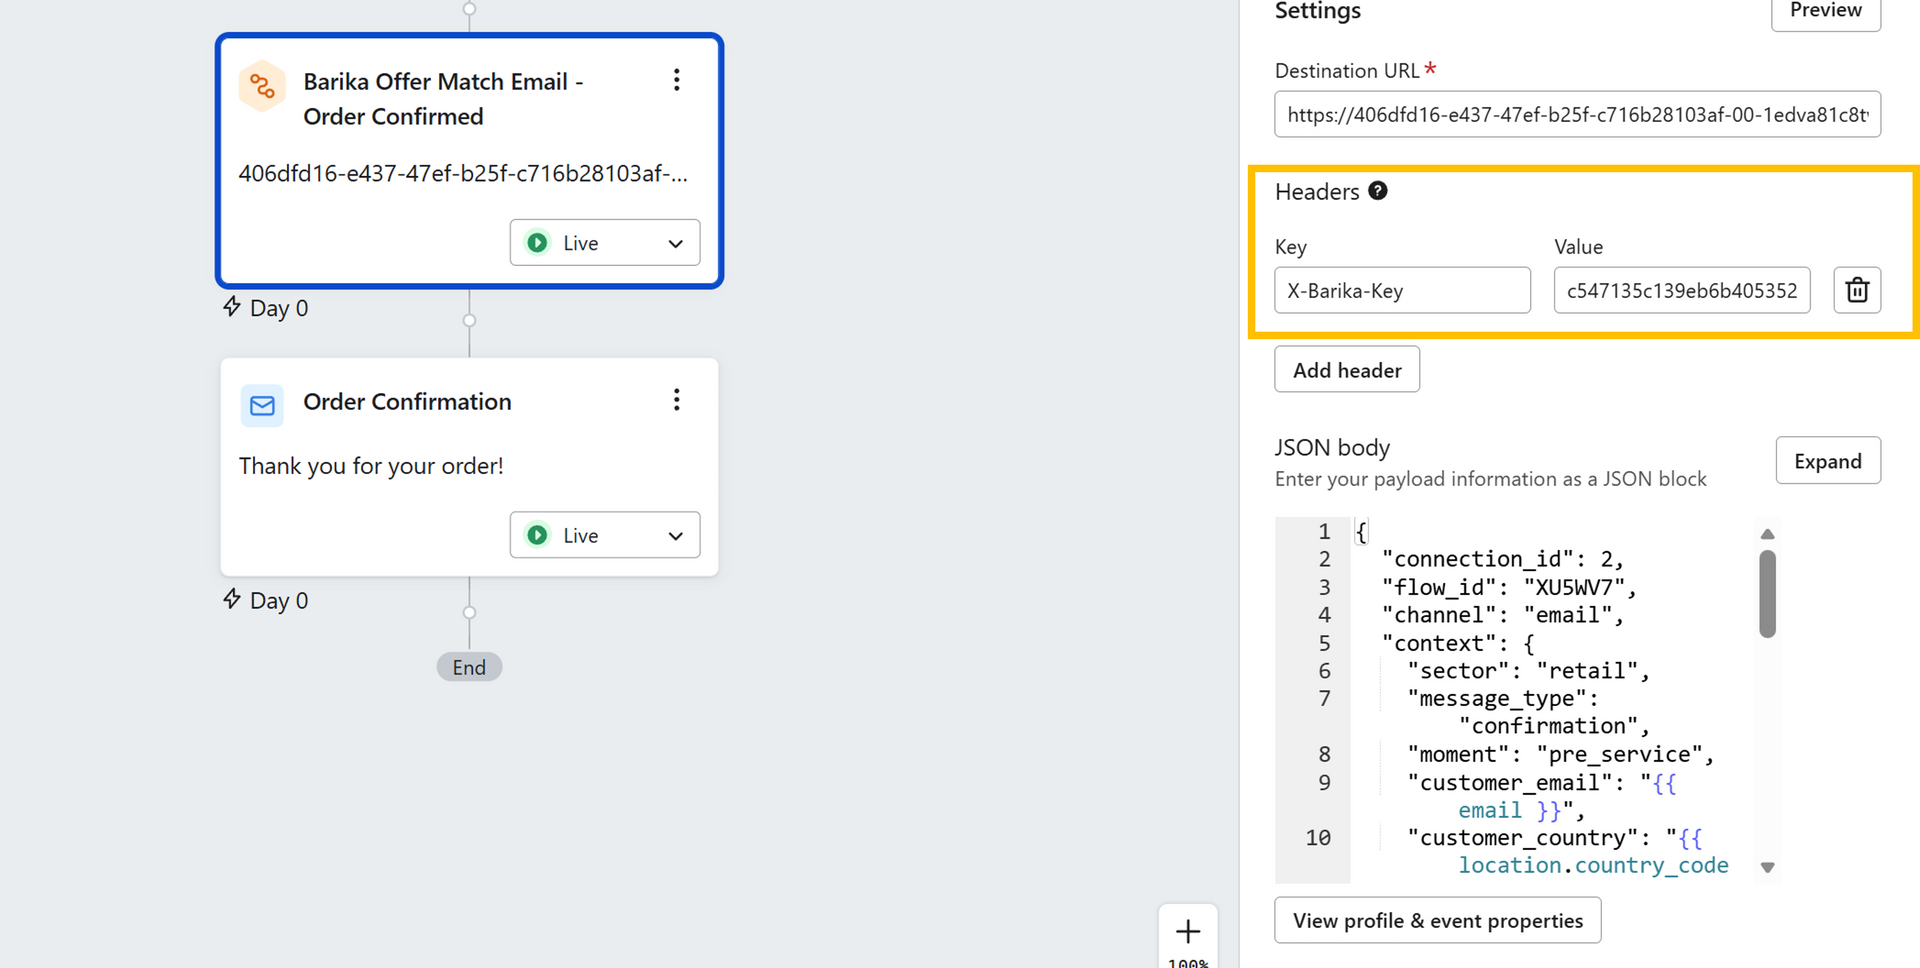
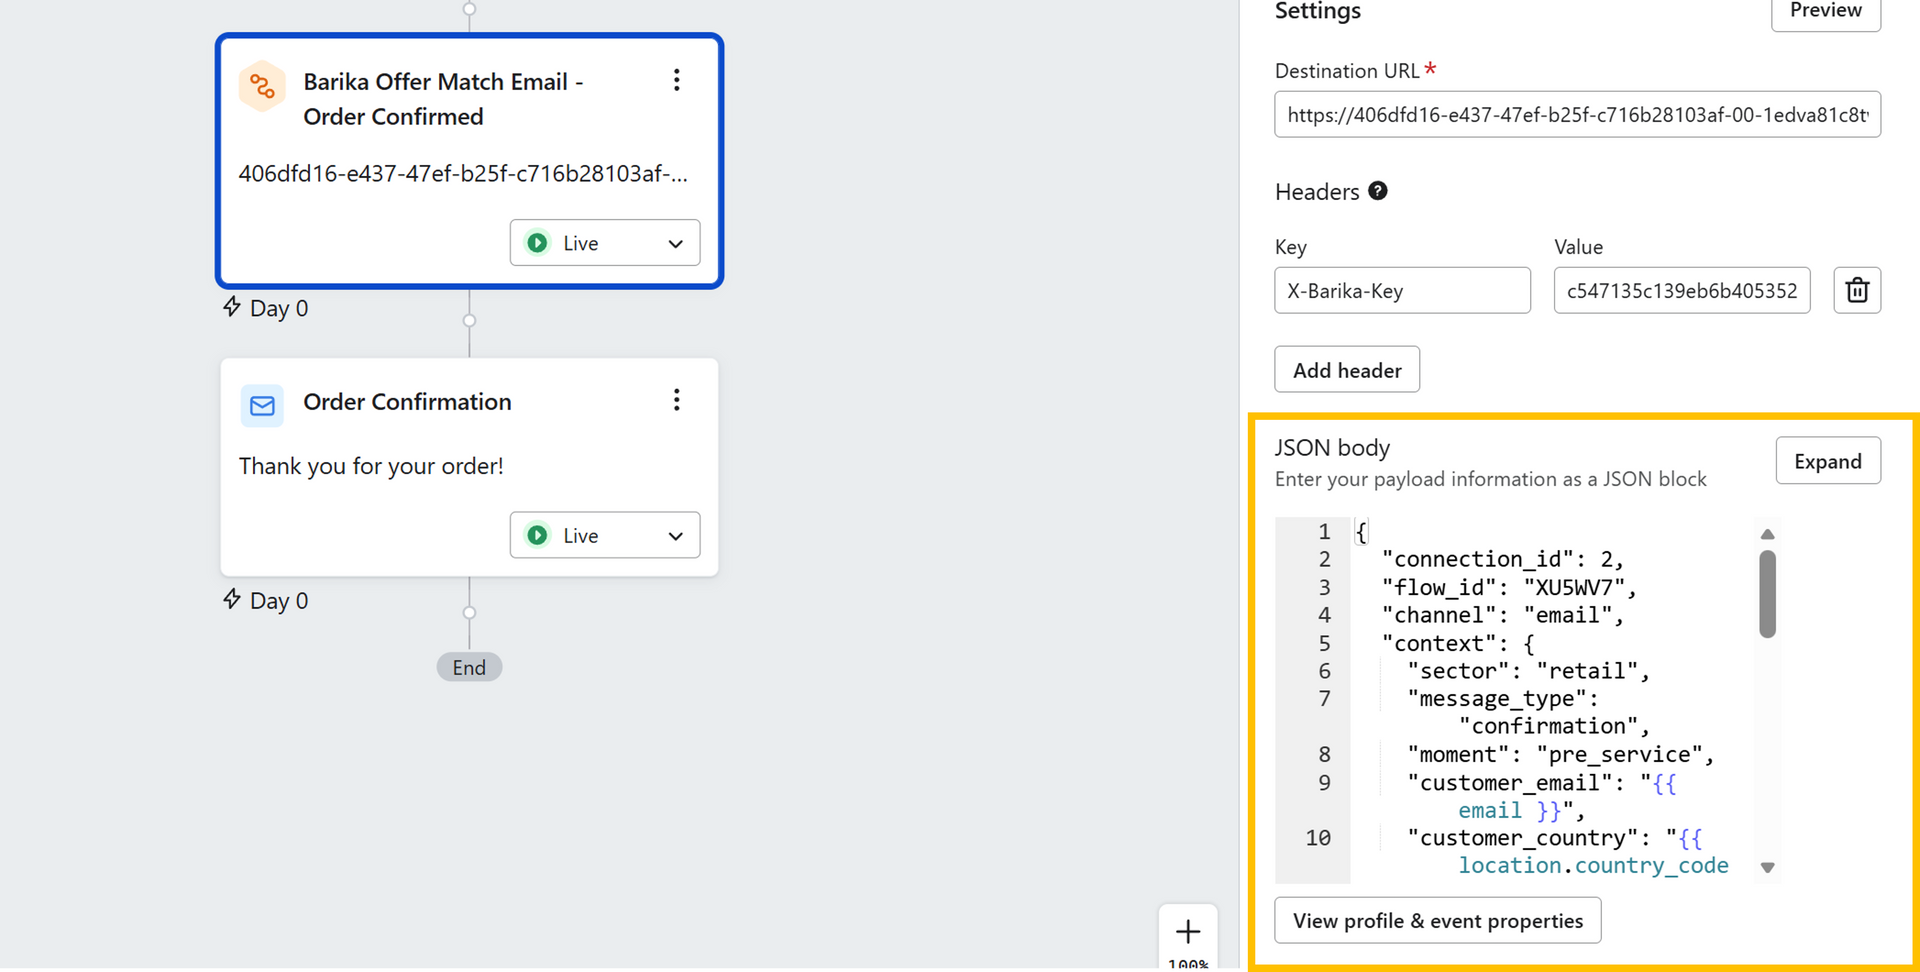
Step 3: Configure Webhook Name and Destination URL
In the Webhook details panel:
3.1 Webhook Name: Give your webhook a descriptive name (e.g., Barika Offer Match - Order Confirmed)
3.2 Destination URL: Paste the Webhook Endpoint URL you copied in Step 1. It will look something like this: https://app.barika.ai/api/klaviyo/runtime/match
Tip: You can find this in Barika → Integration Centre → your Klaviyo connection → "View Webhook Setup Details"
Step 4: Add Authentication Header
In the Headers section, enter your authentication credentials:
1 - In the Key field, enter: X-Barika-Key
2 - In the Value field, paste your Webhook Secret (copied from Step 1)
3 - Click Add header if you need to add additional headers (optional)
This authenticates your webhook requests so Barika knows they're coming from your Klaviyo account.
Tip: Where to find your Webhook Secret: Go to Barika → Integration Centre → click on your Klaviyo connection → "View Webhook Setup Details" → copy the Webhook Secret.
Step 5:Copy Your JSON Payload
Barika automatically generates the JSON payload for each flow you enabled during onboarding. No manual editing required!
5.1 Get Your Pre-Generated JSON
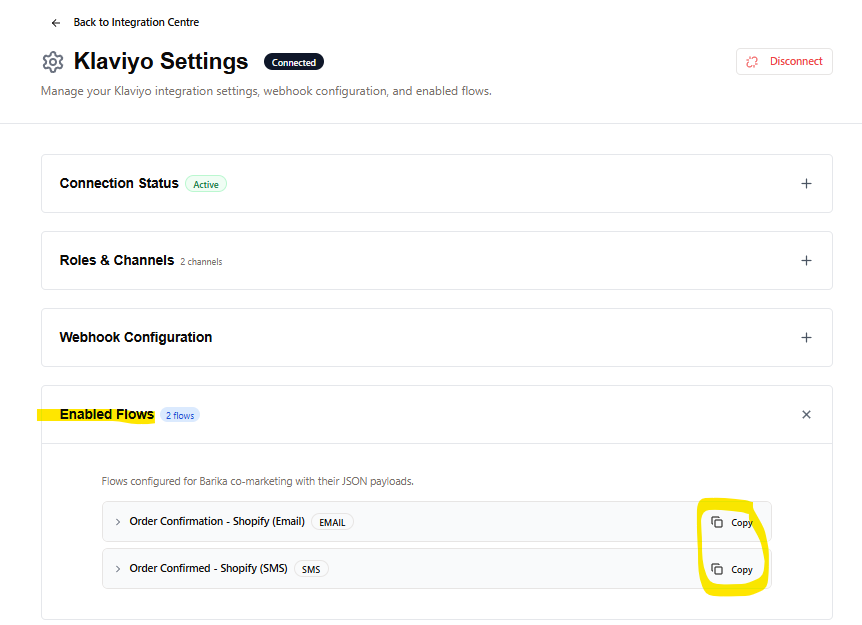
1 - Go to Barika → Integration Centre
2 - Find your your Klaviyo connection
3 - Click "Manage Settings" to open the Klaviyo Settings page
4 -Expand the 'Enabled Flows' section
5 - Click Copy next to the flow you're configuring
What the Payload Looks Like (Do Not Copy This)
Do not copy the example below. Always use the payload generated for you in Step 5.1. Your connection_id and other values are unique to your account.
Your generated payload will look similar to the below:
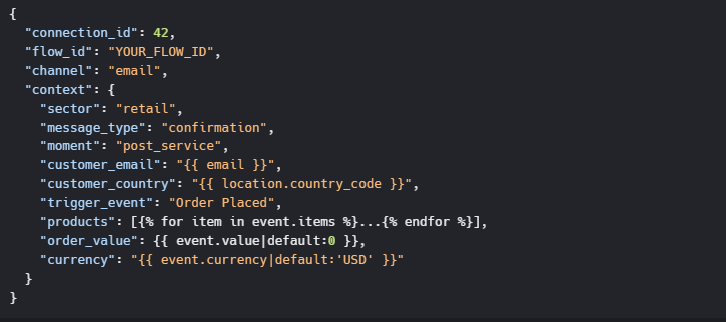
What the Payload Looks Like (Do Not Copy This)
Do not copy the example below. Always use the payload generated for you in Step 5.1. Your connection_id and other values are unique to your account.
Your generated payload will look similar to the below.
Note to developers only:
- The {{ }} and {% %} values are Klaviyo Django template variables that get filled in automatically when the webhook fires. The products array will contain your order's line items with category data when available.
- If you're in the Retail sector, your JSON payload contains Liquid expressions specific to your commerce platform (Shopify, WooCommerce, BigCommerce, Magento, or Custom). For example, Shopify uses event.line_items and item.title, while WooCommerce uses event.line_items and item.name. This is configured automatically based on your platform selection during onboarding.
5.2 Paste into Klaviyo
1 - In the Klaviyo webhook's JSON body section, delete any existing content
2 - Paste the JSON you copied from Barika
3 - That's it - all values are pre-configured!
5.3 Save and Set to Live
1 - Click Save to save your webhook configuration
2 - Click the Draft dropdown on the webhook step
3 - Change the status to Live
Important: Webhooks in "Draft" status will not fire. You must set them to "Live" for Barika to receive requests.
When properly configured, your flow should look like this:
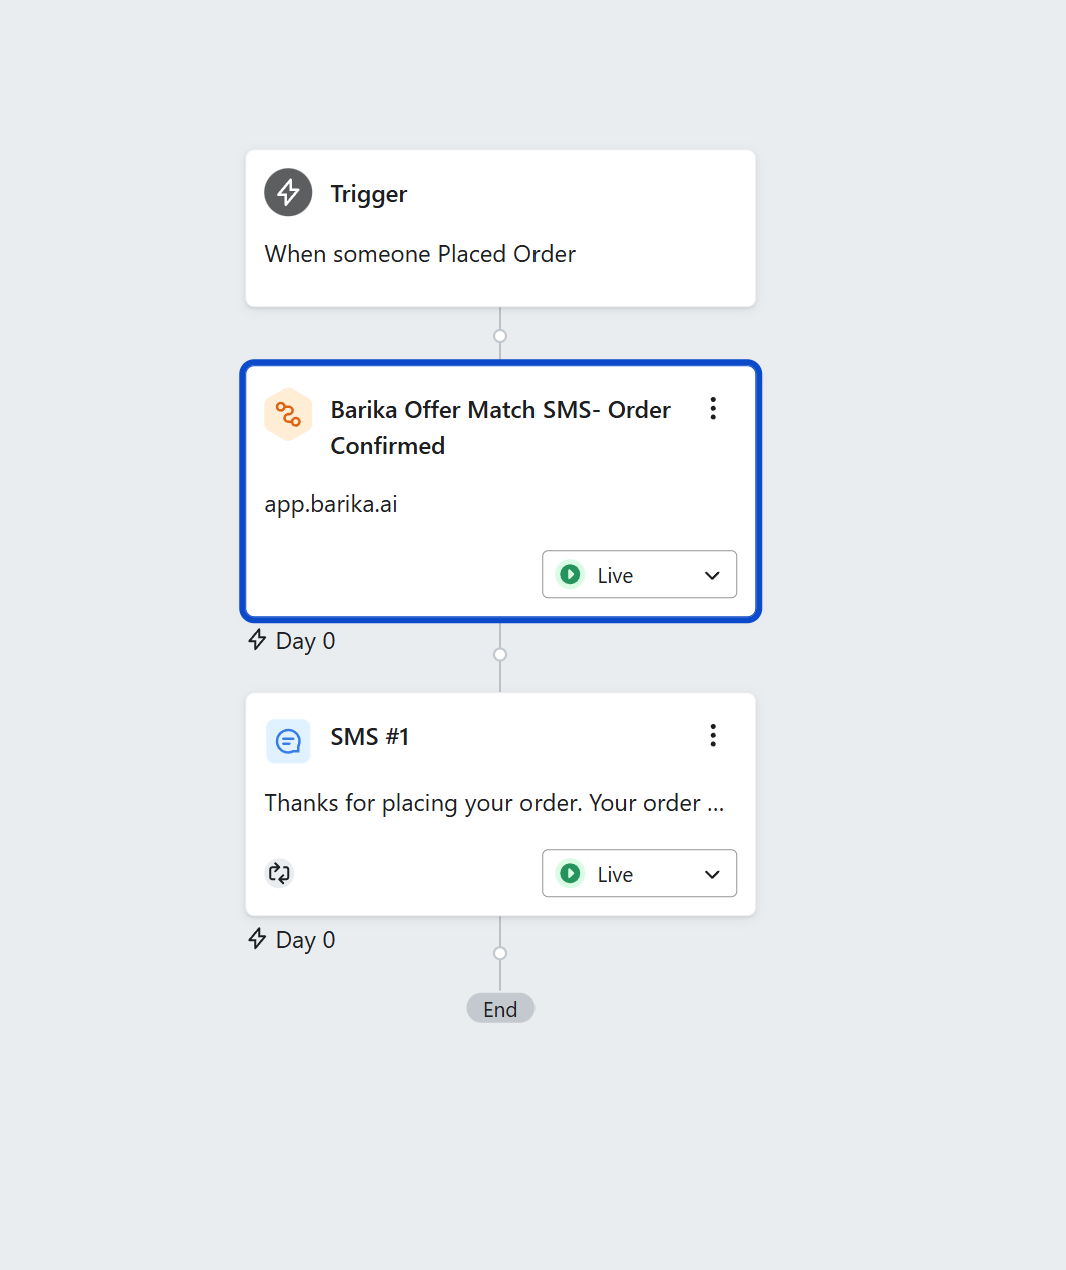
Both the webhook step and the message step should show Live status (green indicator).
Step 6: Insert Offer into Your Message
After your webhook runs, Barika returns offer data. Now you need to edit the message step in your flow to display the offer to your customer.
6A: For Email Flows
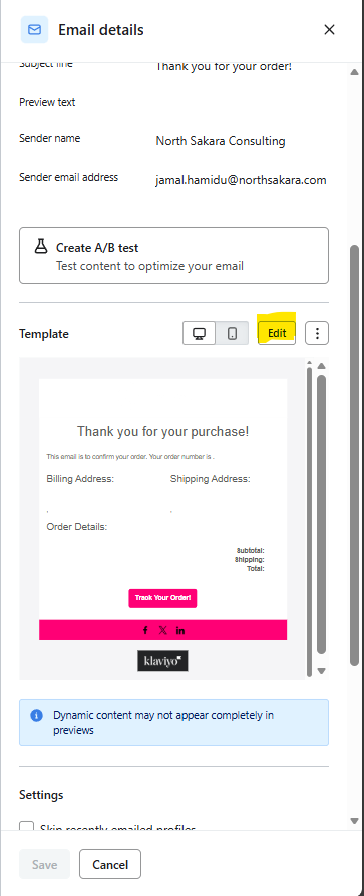
6A.1 Open Your Email Template Editor
1 - In your Klaviyo flow, click on your Email step (e.g., "Order Confirmation")
2 - The Email details panel opens on the right side
3 - Scroll down to the Template section
4 - Click the Edit button to open the email template editor
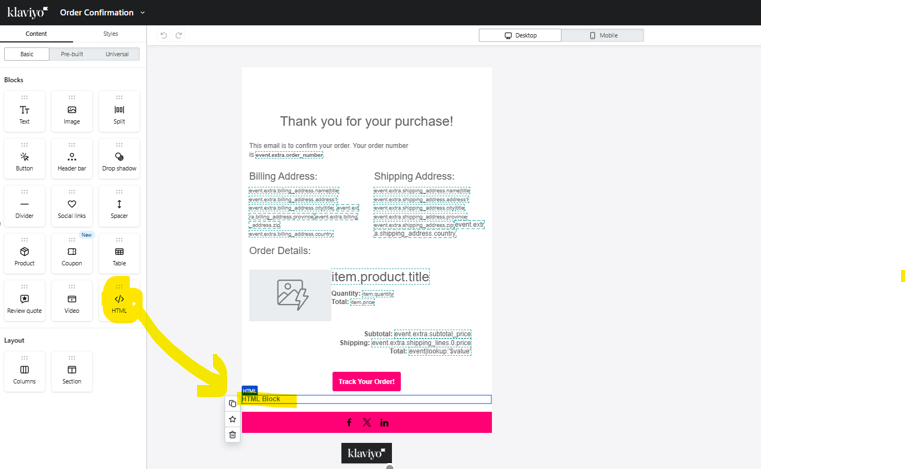
6A.2. Add an HTML Block for the Partner Offer
1 -In the template editor, you'll see the Blocks panel on the left sidebar
2- Scroll down in the Blocks panel until you find HTML (it's in the lower section, near Video)
3 - Drag the HTML block into your email where you want the partner offer to appear (we recommend placing it after your main content, before the footer):
6A.3. Paste the Offer Code
1 -After dragging the HTML block, a panel opens on the left side with Content and Display tabs
2 - In the Content tab, you'll see a code editor with placeholder text (<strong>HTML Block</strong>)
3 - Select all the placeholder text and delete it
4 - Copy and paste this exact code below into the 'Content' HTML tab :
{% if person|lookup:'barika_offer_image_url' %}
<a href="{{ person|lookup:'barika_offer_click_url' }}" target="_blank" style="text-decoration: none;">
<img src="{{ person|lookup:'barika_offer_image_url' }}" alt="Partner Offer" style="max-width: 600px; width: 100%; height: auto; border: 0;" />
</a>
{% endif %}
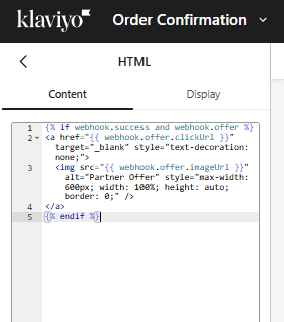
5 - The template editor auto-saves your changes (no save button needed)
6 - Click Exit in the top-right corner to return to the flow
6B. For SMS Flows
6B.1 Open Your SMS Content Editor
1 - In your Klaviyo flow, click on your SMS step (e.g., "SMS #1")
2 - The Text message details panel opens on the right side
3 - Find the Content section
4 - Click the Edit button next to Content
Note for Transactional Messages: If your SMS has "Transactional" status already approved (showing green "Accepted" badge), Klaviyo will prompt you to remove the transactional status before editing. Click "Remove transactional status", make your edits, then re-apply for transactional status after saving.
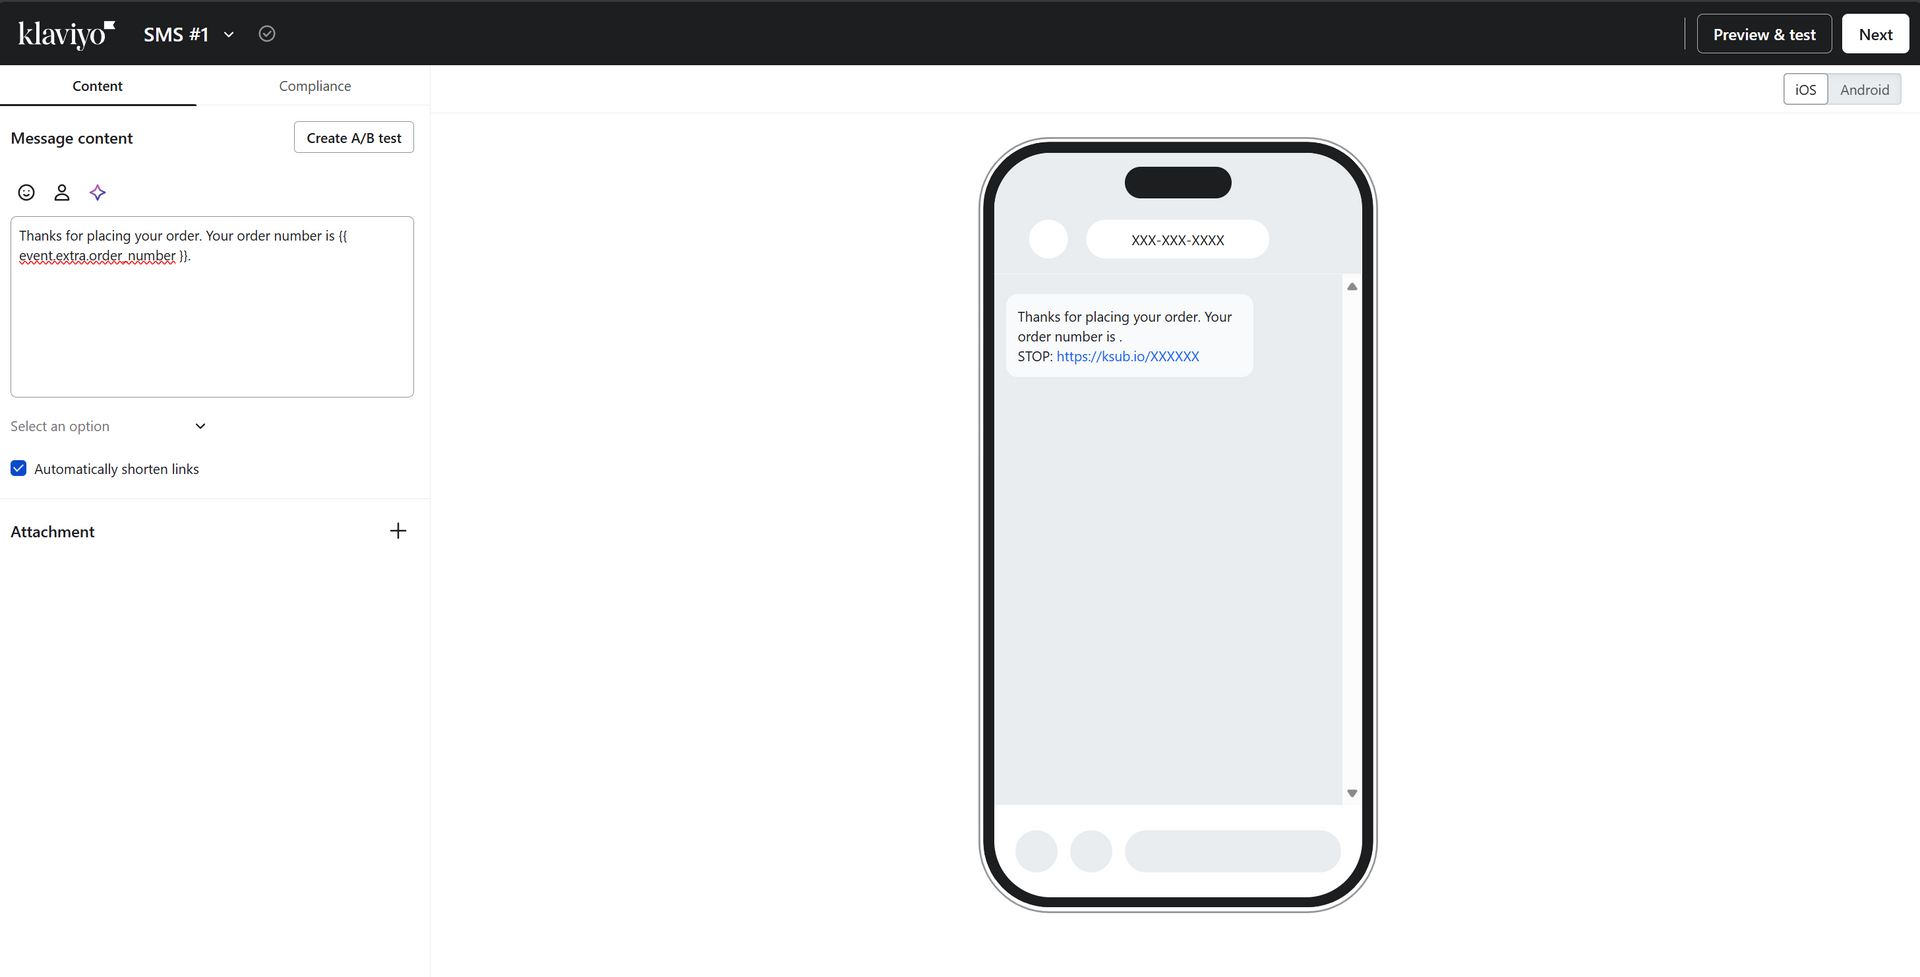
5 - A full-page SMS editor opens showing your message content on the left and a phone preview on the right
6B.2 Add the Partner Offer to Your Message
1 - In the message content area (left side), position your cursor where you want the partner offer to appear (we recommend after your main message).
Below: It will look something like the below before the partner offer code is added.
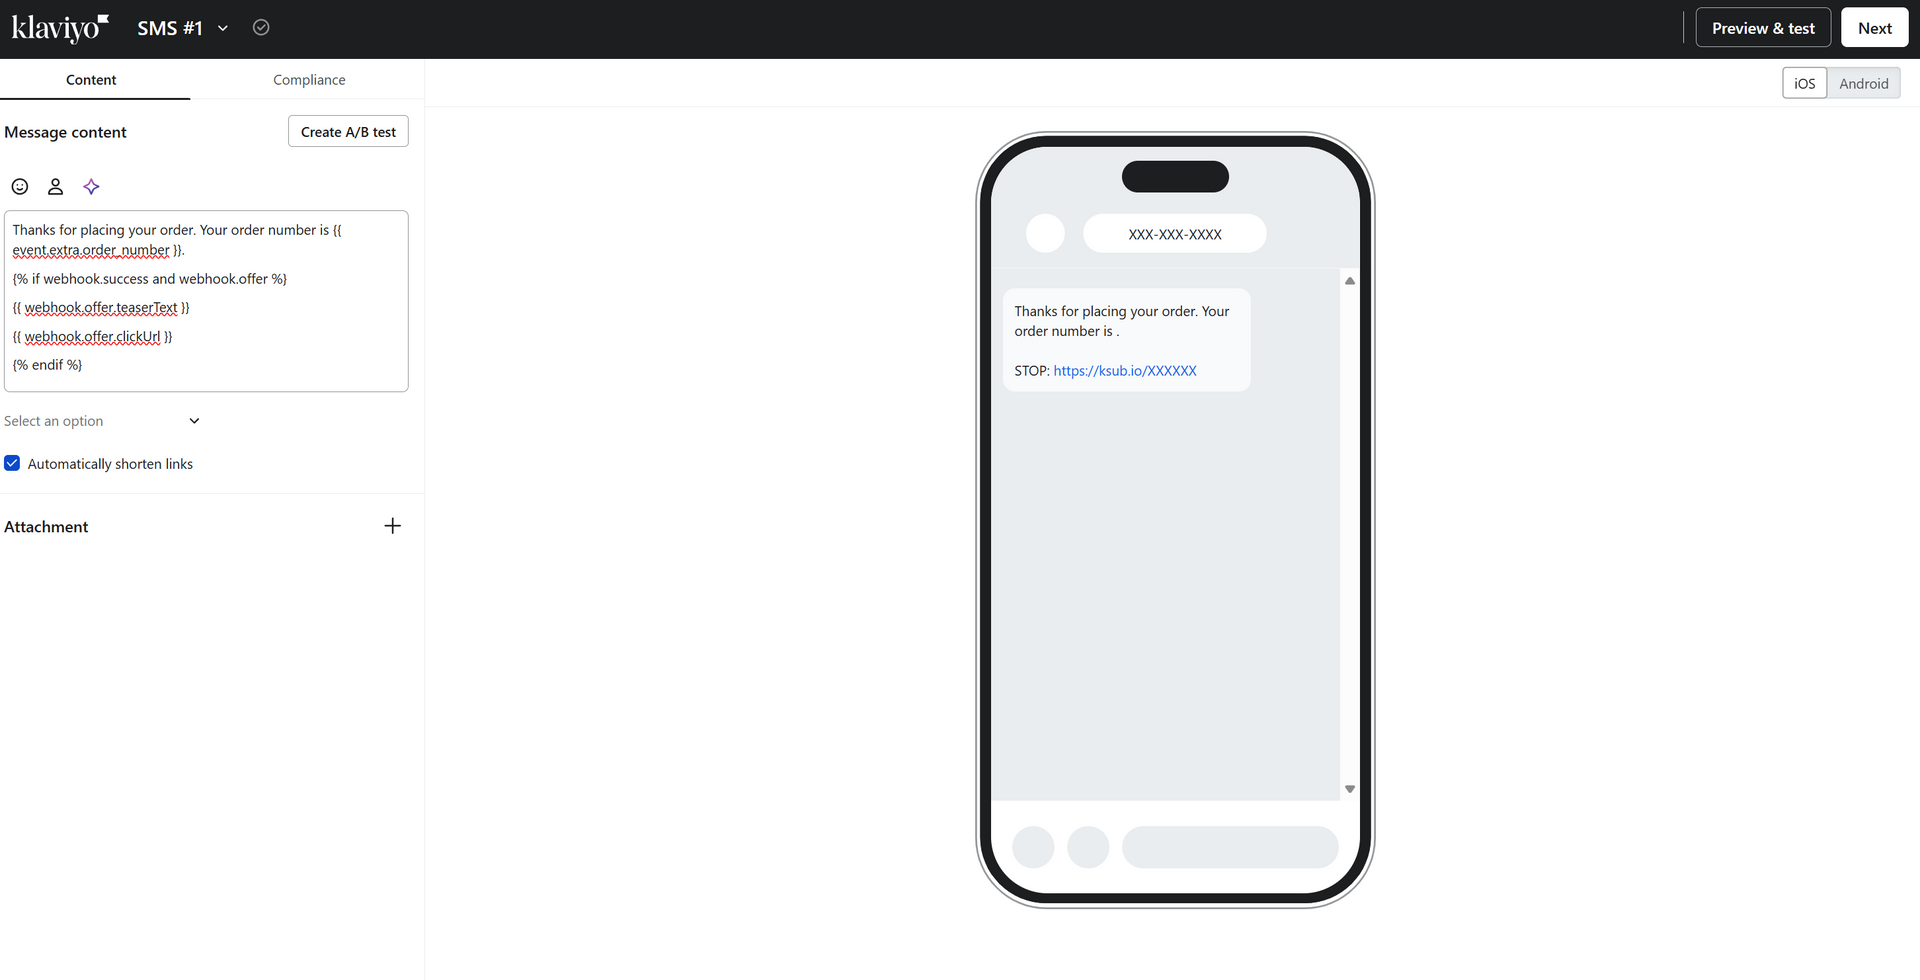
2 - Add the following code on new lines.
{% if person|lookup:'barika_offer_id' %}
{{ person|lookup:'barika_offer_message' }}
{% endif %}
This displays the fully composed offer message in the format: "Offer from [Brand]: [Teaser] [Link]"
After
- Your message with the partner offer code added will look like the below.
4. Setup complete
You have finished setting up the Barika webhook for your Klaviyo flow.
Your flow will now request partner offers from Barika and display them to your customers.
What happens next:
1 - When this flow triggers, Klaviyo sends a request to Barika
2 - Barika matches an appropriate partner offer (if available)
3 - The offer appears in your message using the template code you added
4 - Repeat Steps 1-6 for each additional flow you want to enable.